Calendar & Scheduling
The calendar is the central hub for managing appointments and sales in your business. The user-friendly design of our interface prioritizes simplicity and ease of use. It is easily accessible upon logging into your account and offers various navigation options.
Key Features
-
Calendar Different Views
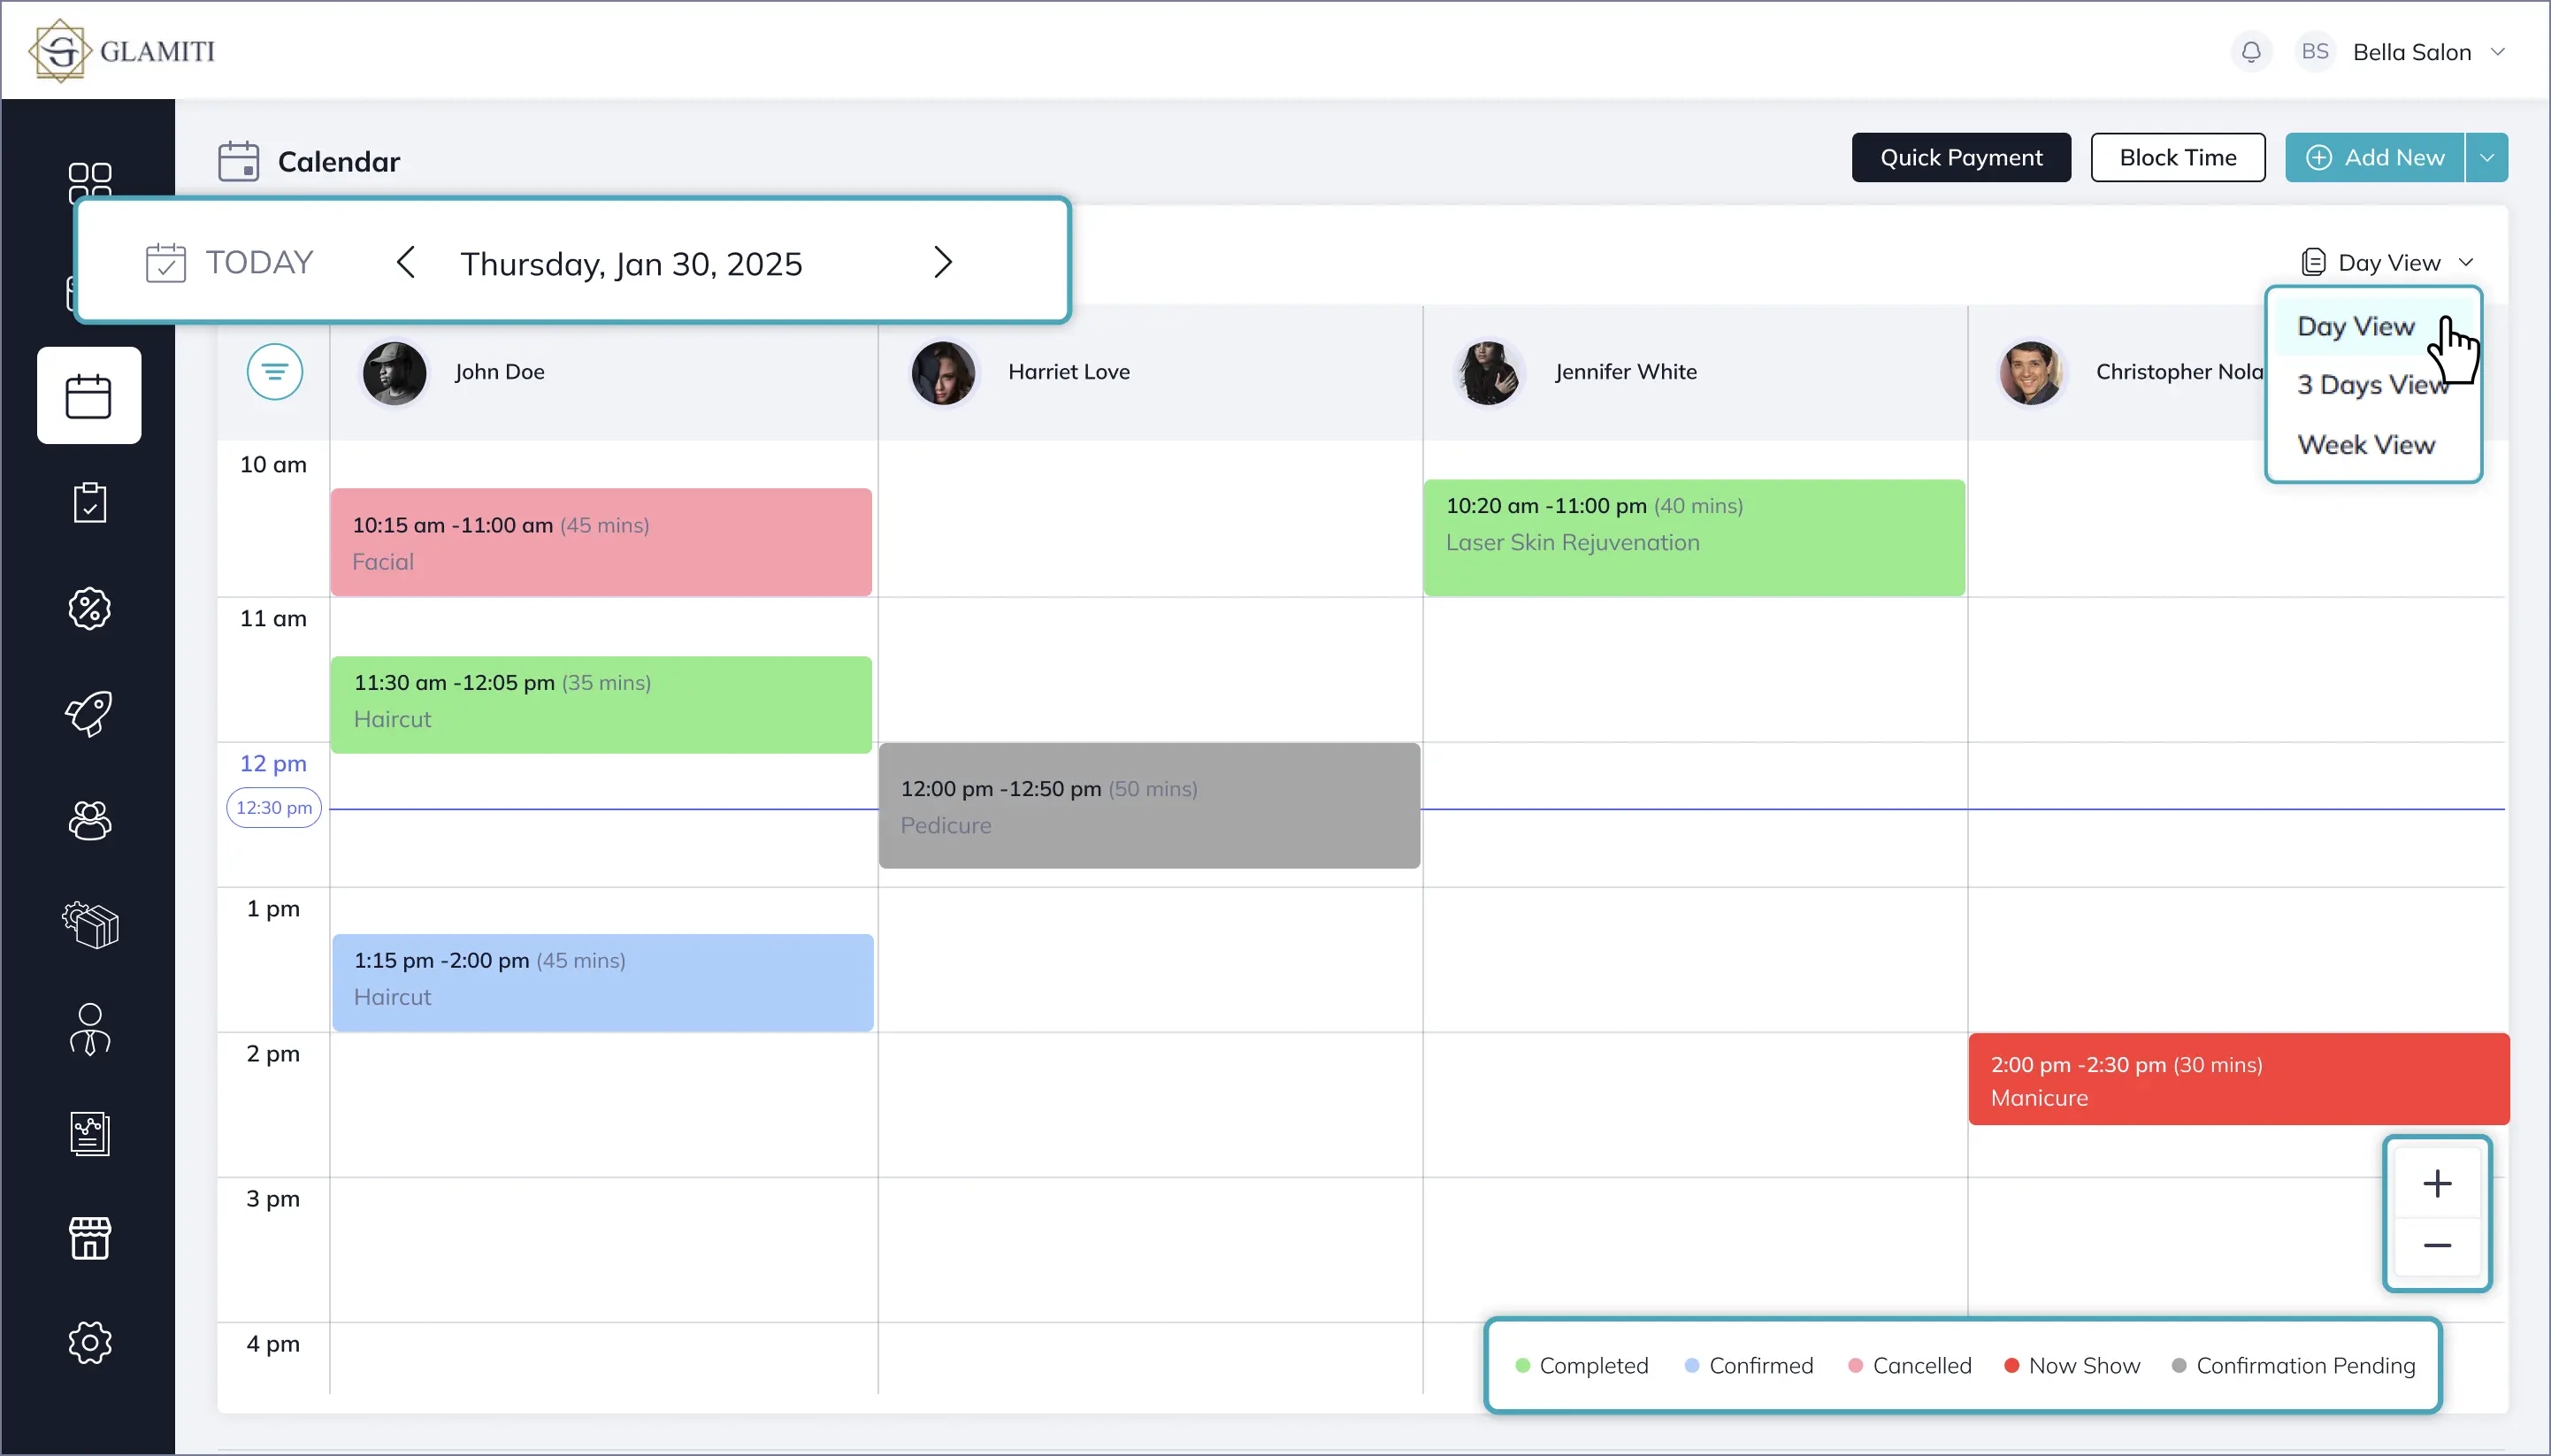
Appointments can be viewed in three different views (Day, 3 Day, Week) for flexible scheduling.
-
Calendar Different Views
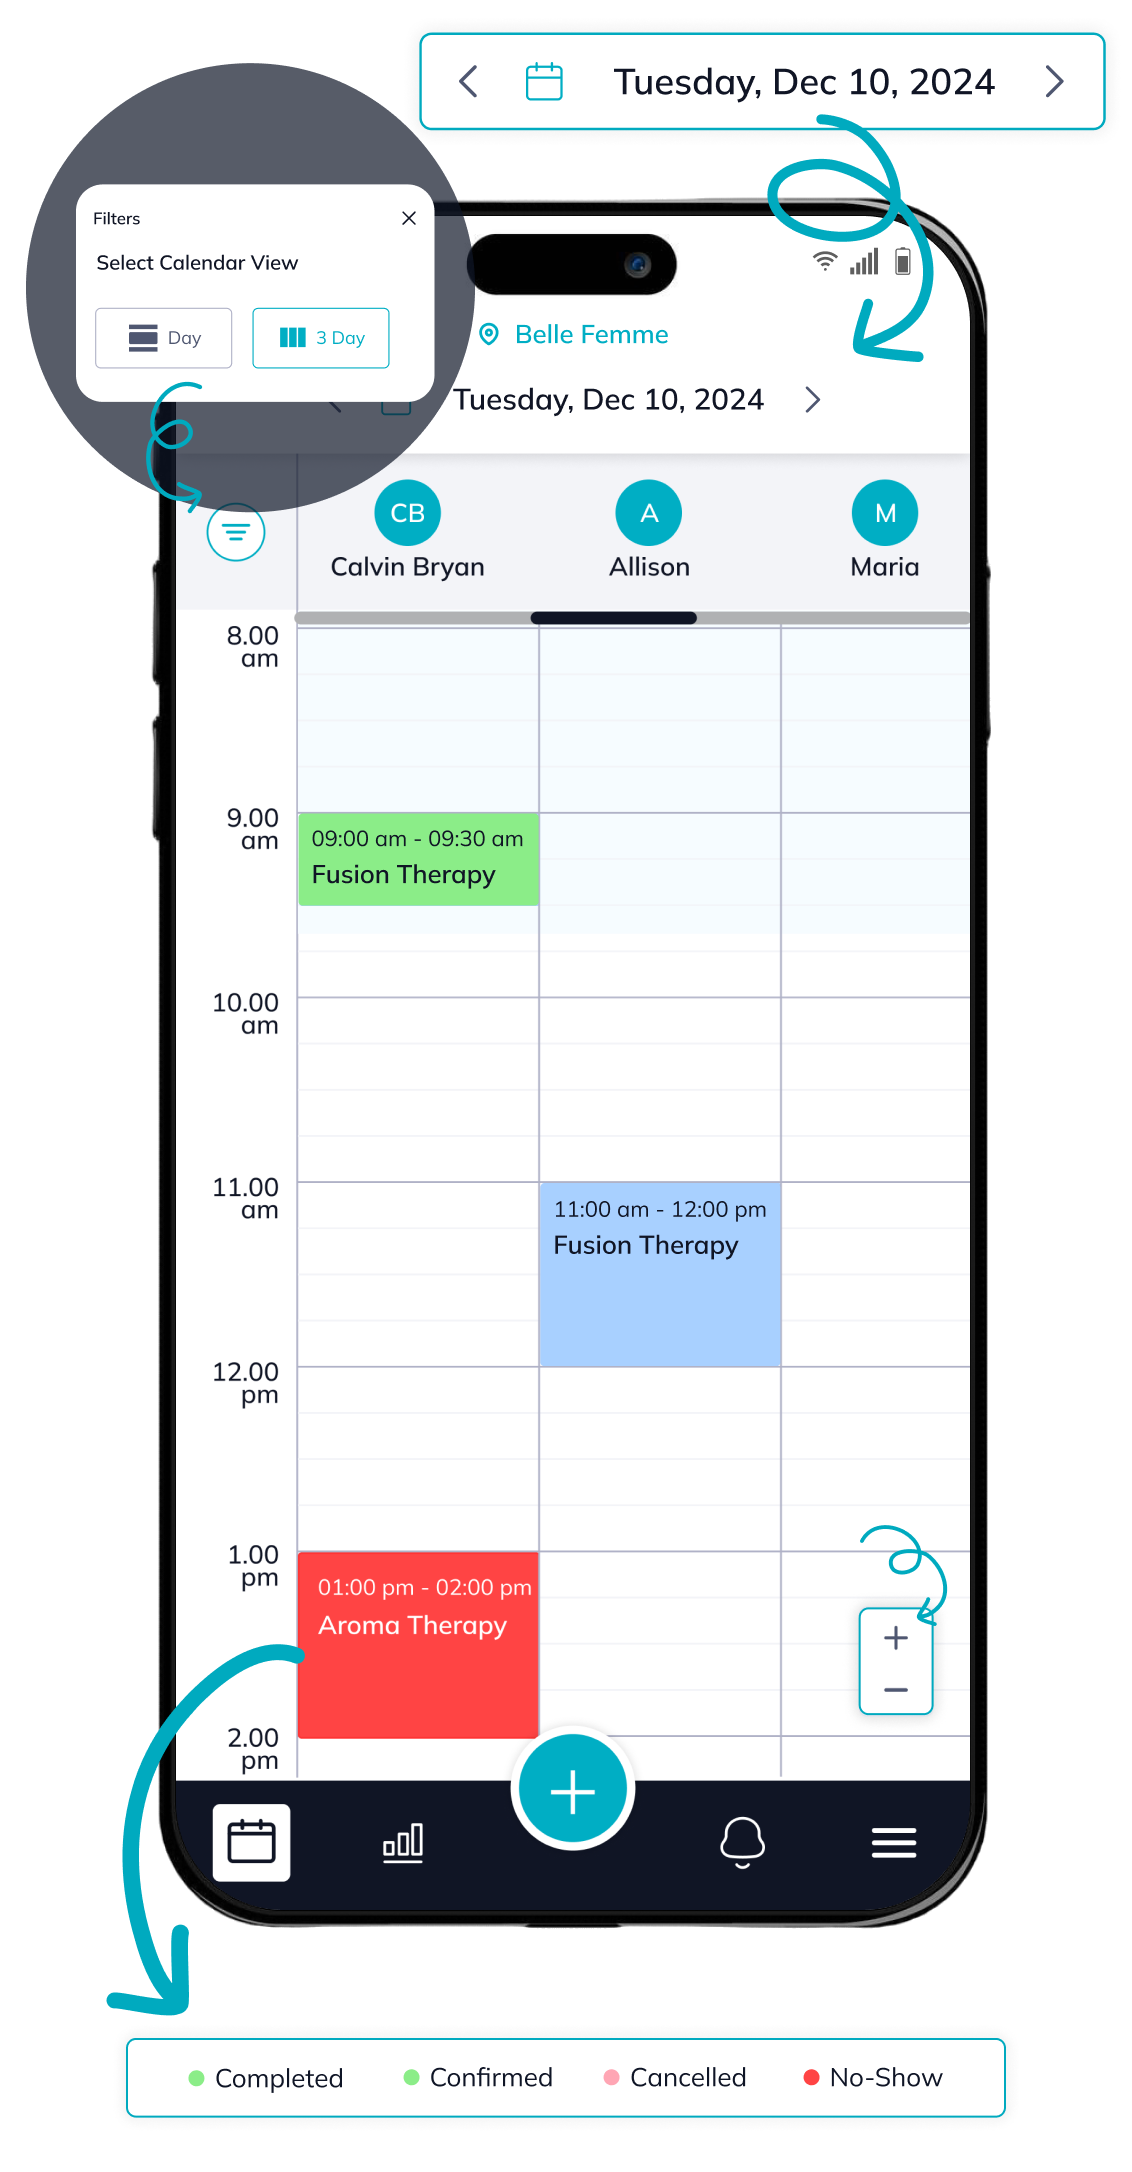
Appointments can be viewed in three different views (Day, 3 Day) for flexible scheduling.
-
Zoom In/Out
The calendar view can be zoomed in or out to adjust time slot visibility.
-
Color Key
The calendar uses color-coding to display different booking statuses and shading to show non-working hours, providing a clear and easy-to-read schedule.
-
Drag n Drop Feature
Editing bookings is simple with the drag-and-drop feature, allowing you to change the professional, time, and date of the service. The length of the booking can also be adjusted to increase or decrease booking service duration. The shortcuts offer an efficient and time-saving method for editing bookings.
Make a New Appointment
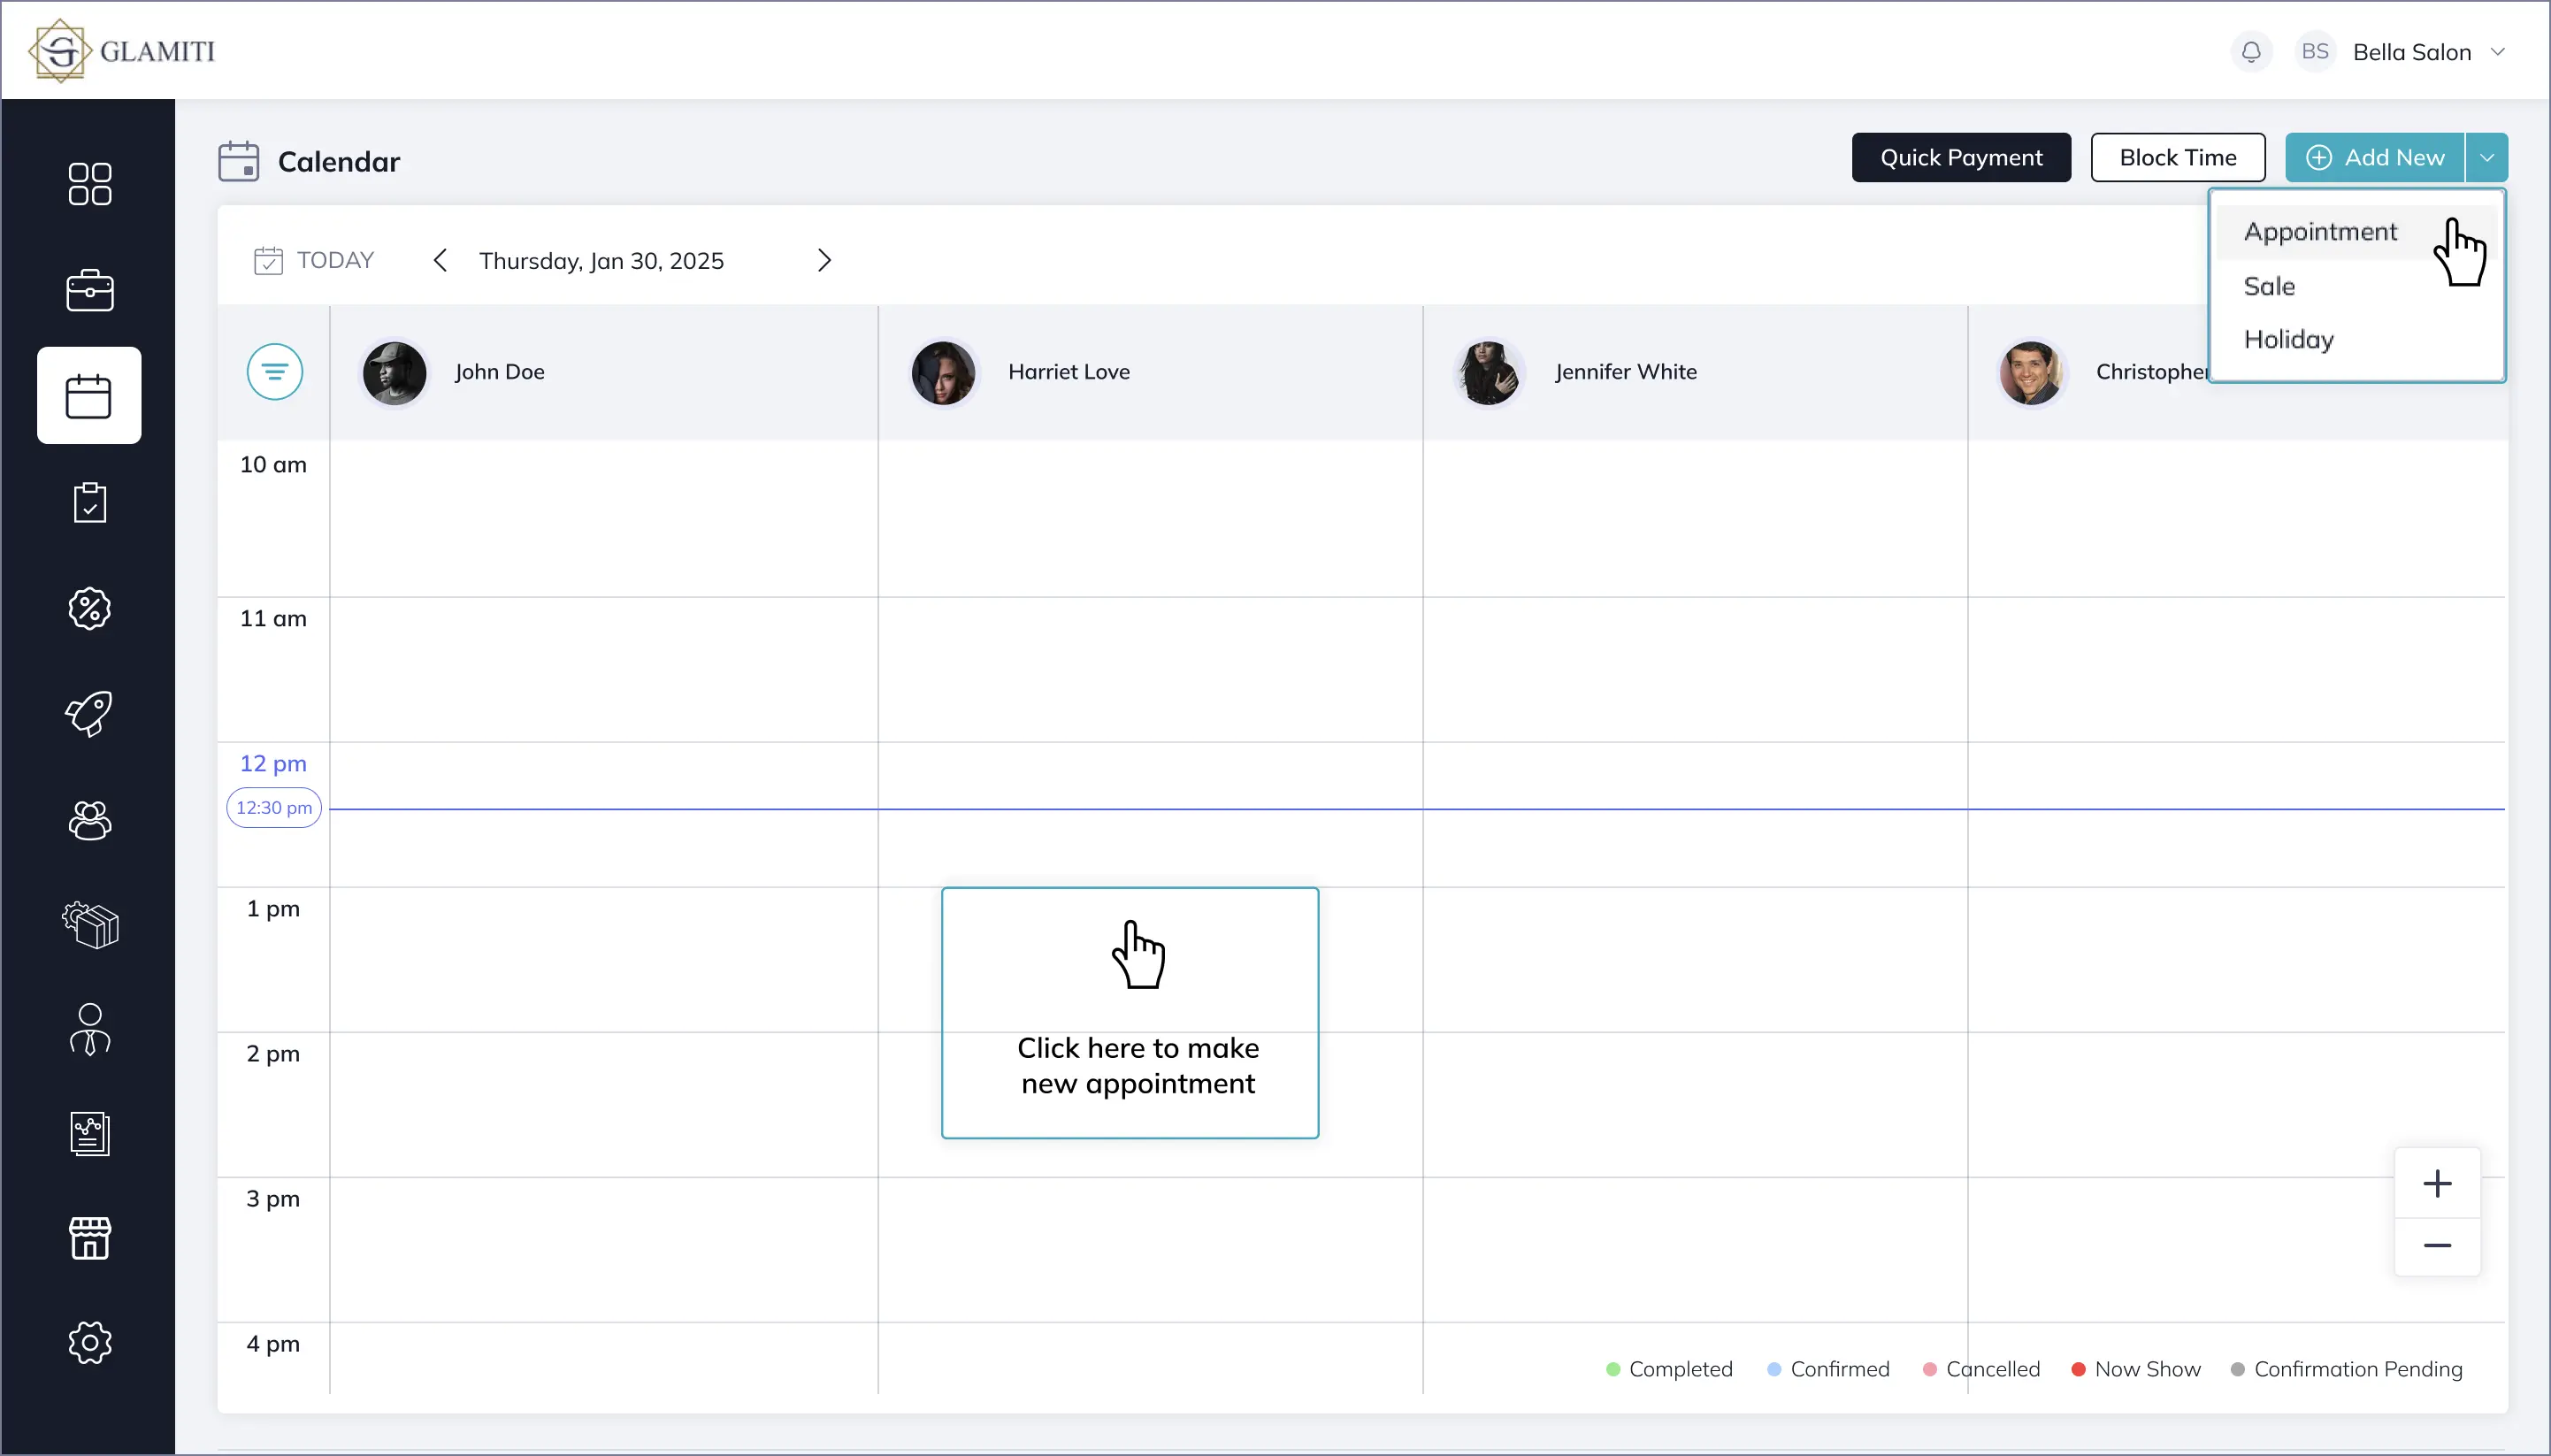
- Click on an empty time slot in the calendar to open the "New Appointment" screen.
OR
Click "Add New" from the top-right corner of the calendar and select New Appointment - Select the service for the appointment.
- Choose a client or keep it as "Guest" (default option).
- Verify the Service Start Time and Assigned Professional.
- Save the appointment; it will appear on the calendar.
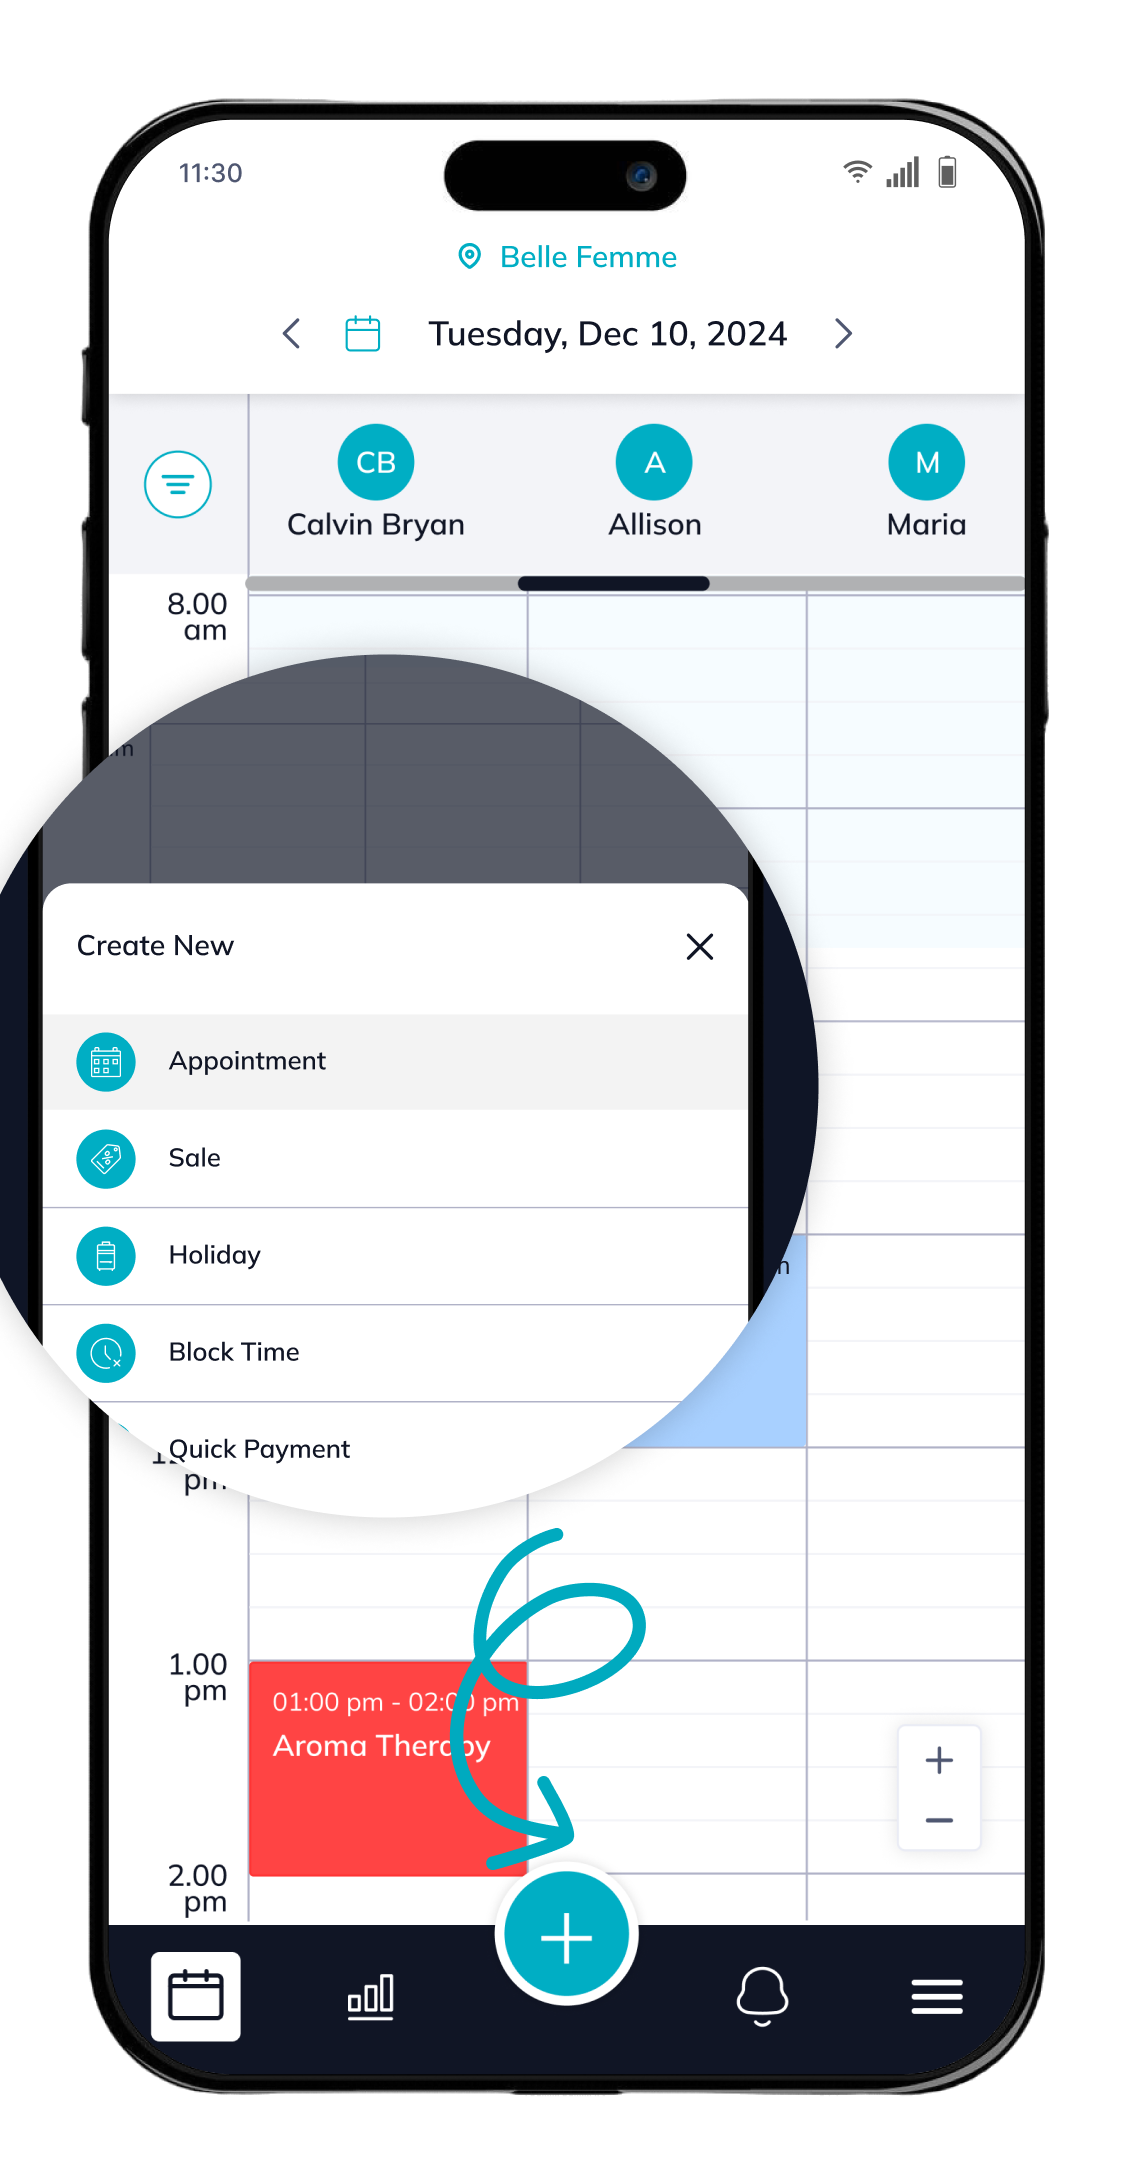
- Tap on an empty time slot in the calendar to open the "New Appointment" screen.
OR
Tap the plus icon "+" at the bottom of the screen and select "New Appointment" from the list. - Select the service for the appointment.
- Choose a client or keep it as "Guest" (default option).
- Verify the Service Start Time and Assigned Professional.
- Save the appointment; it will appear on the calendar.
Modify Prices in Cart
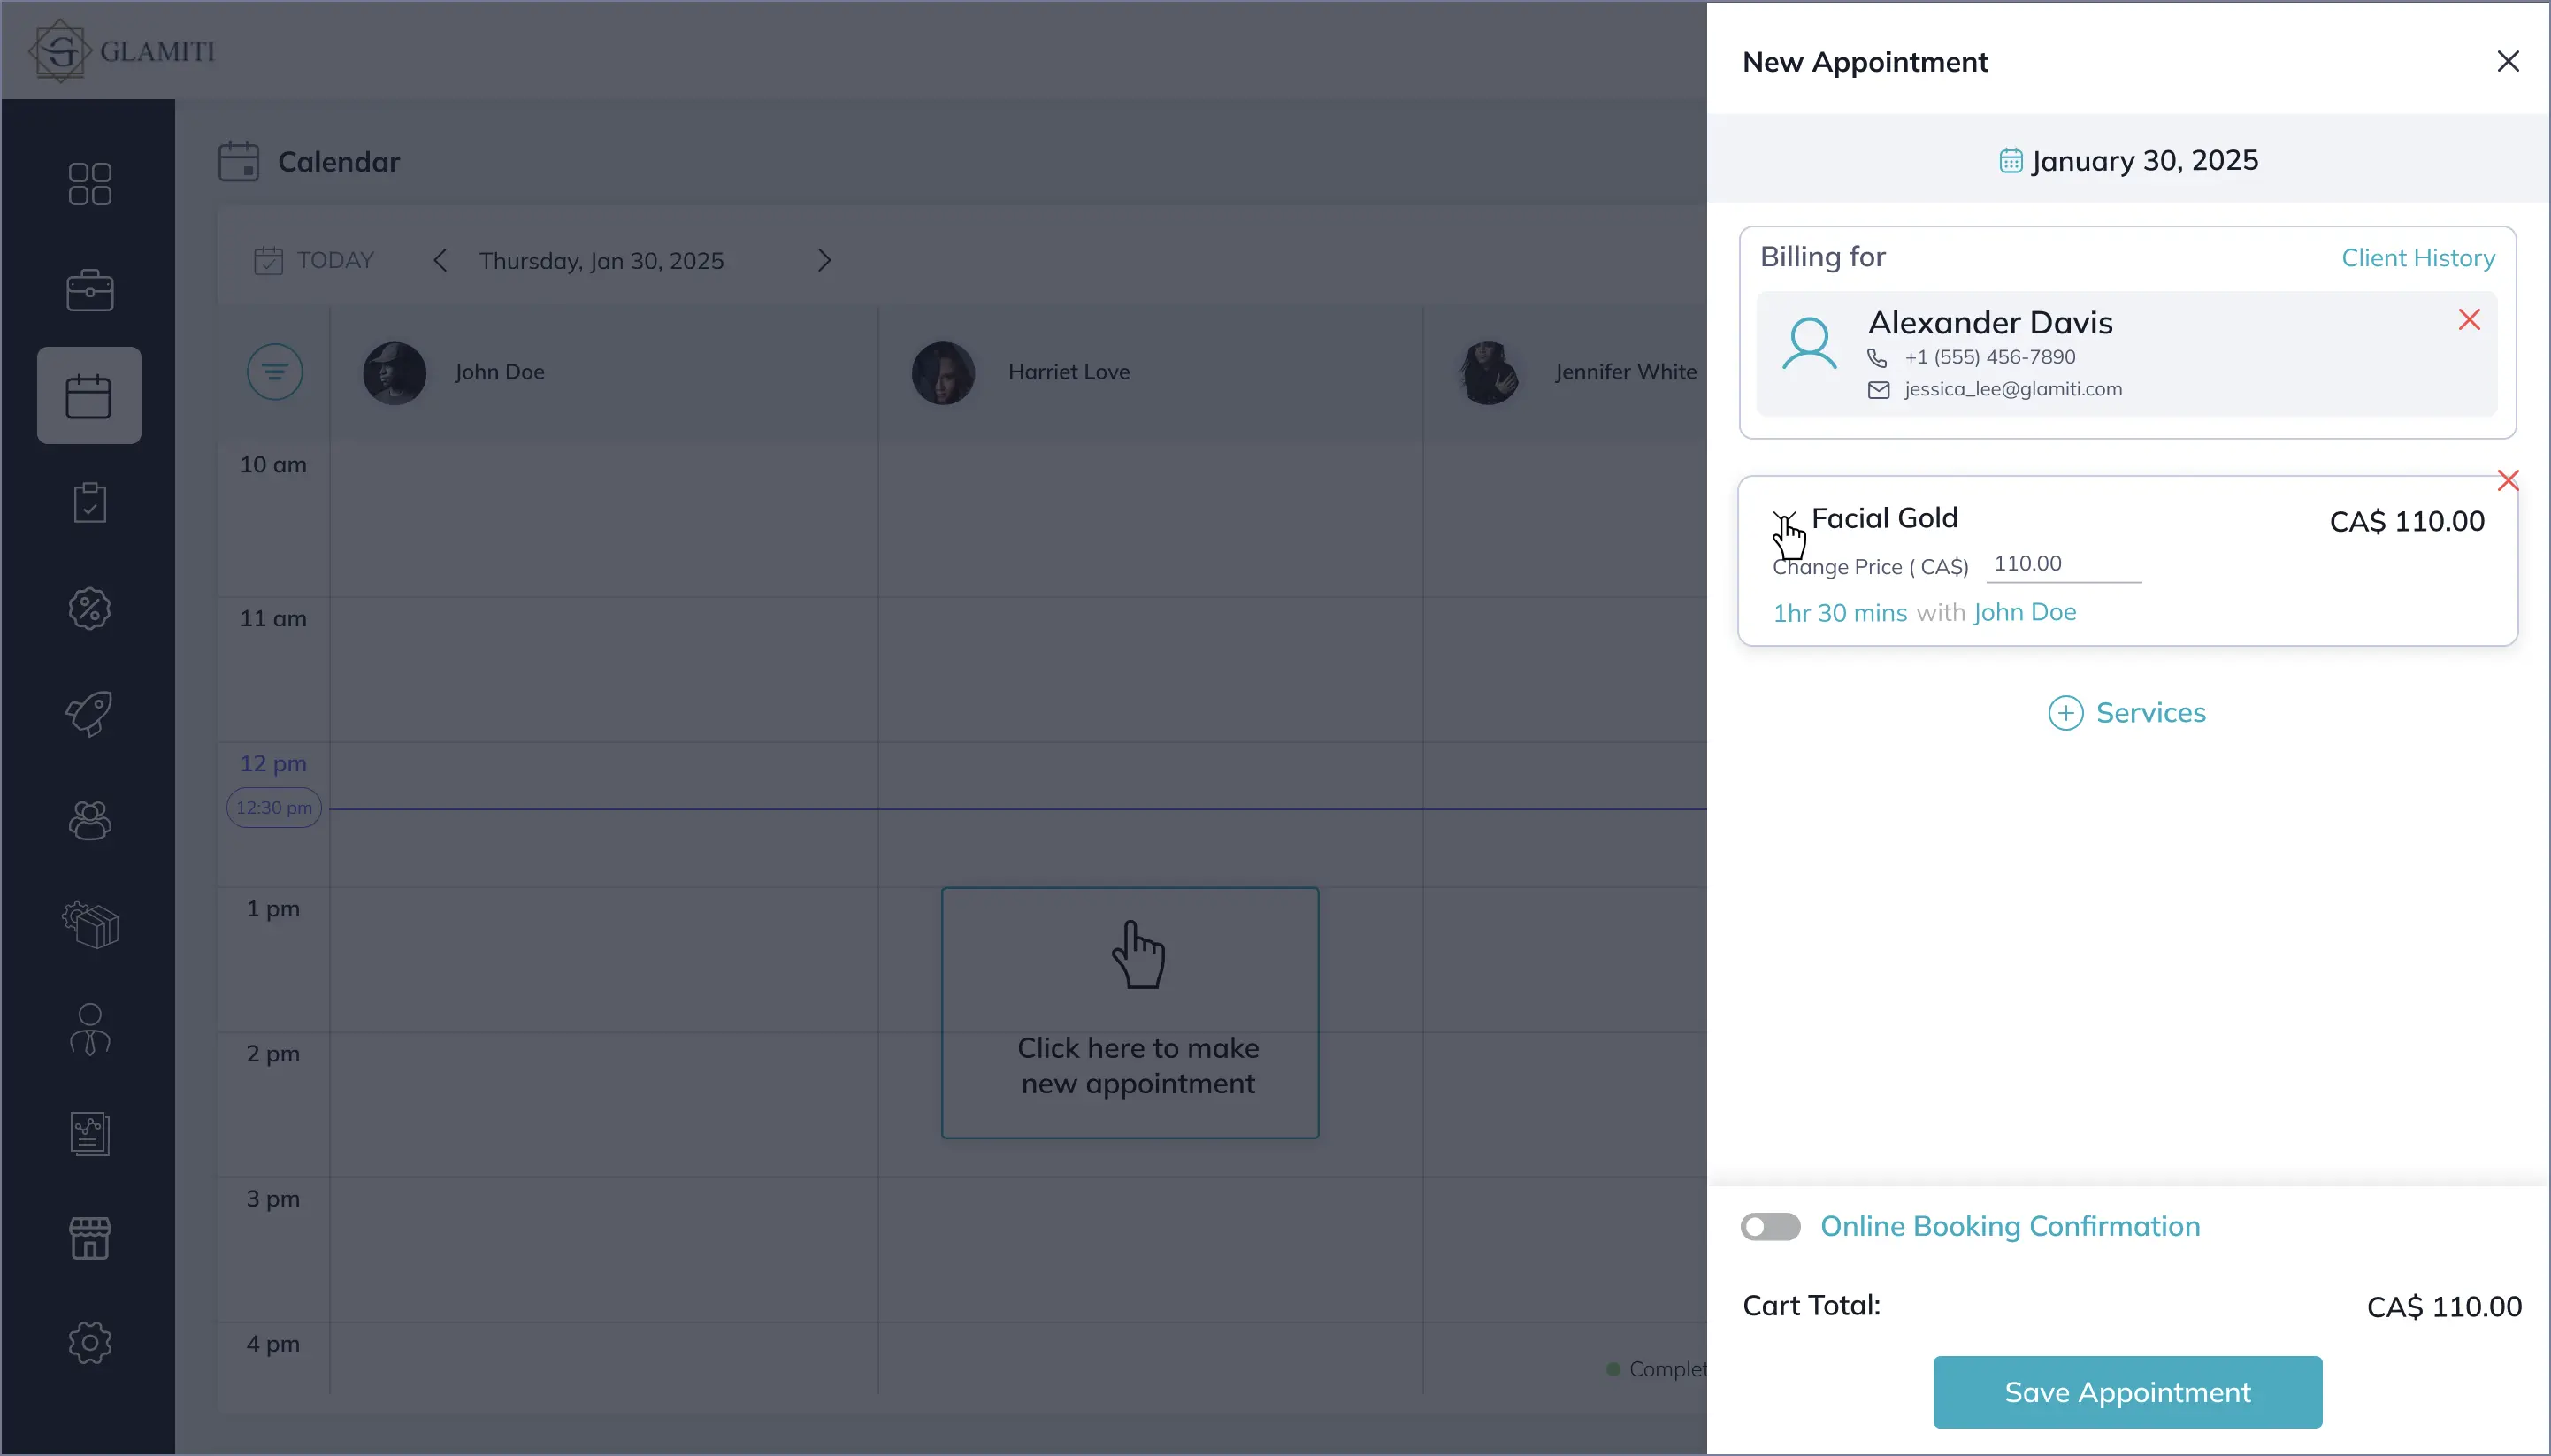
- After adding service/s, click the drop-down button next to the service.
- Enter a new price; the service price updates automatically.
- The updated price becomes the reference value and applies only to that appointment.
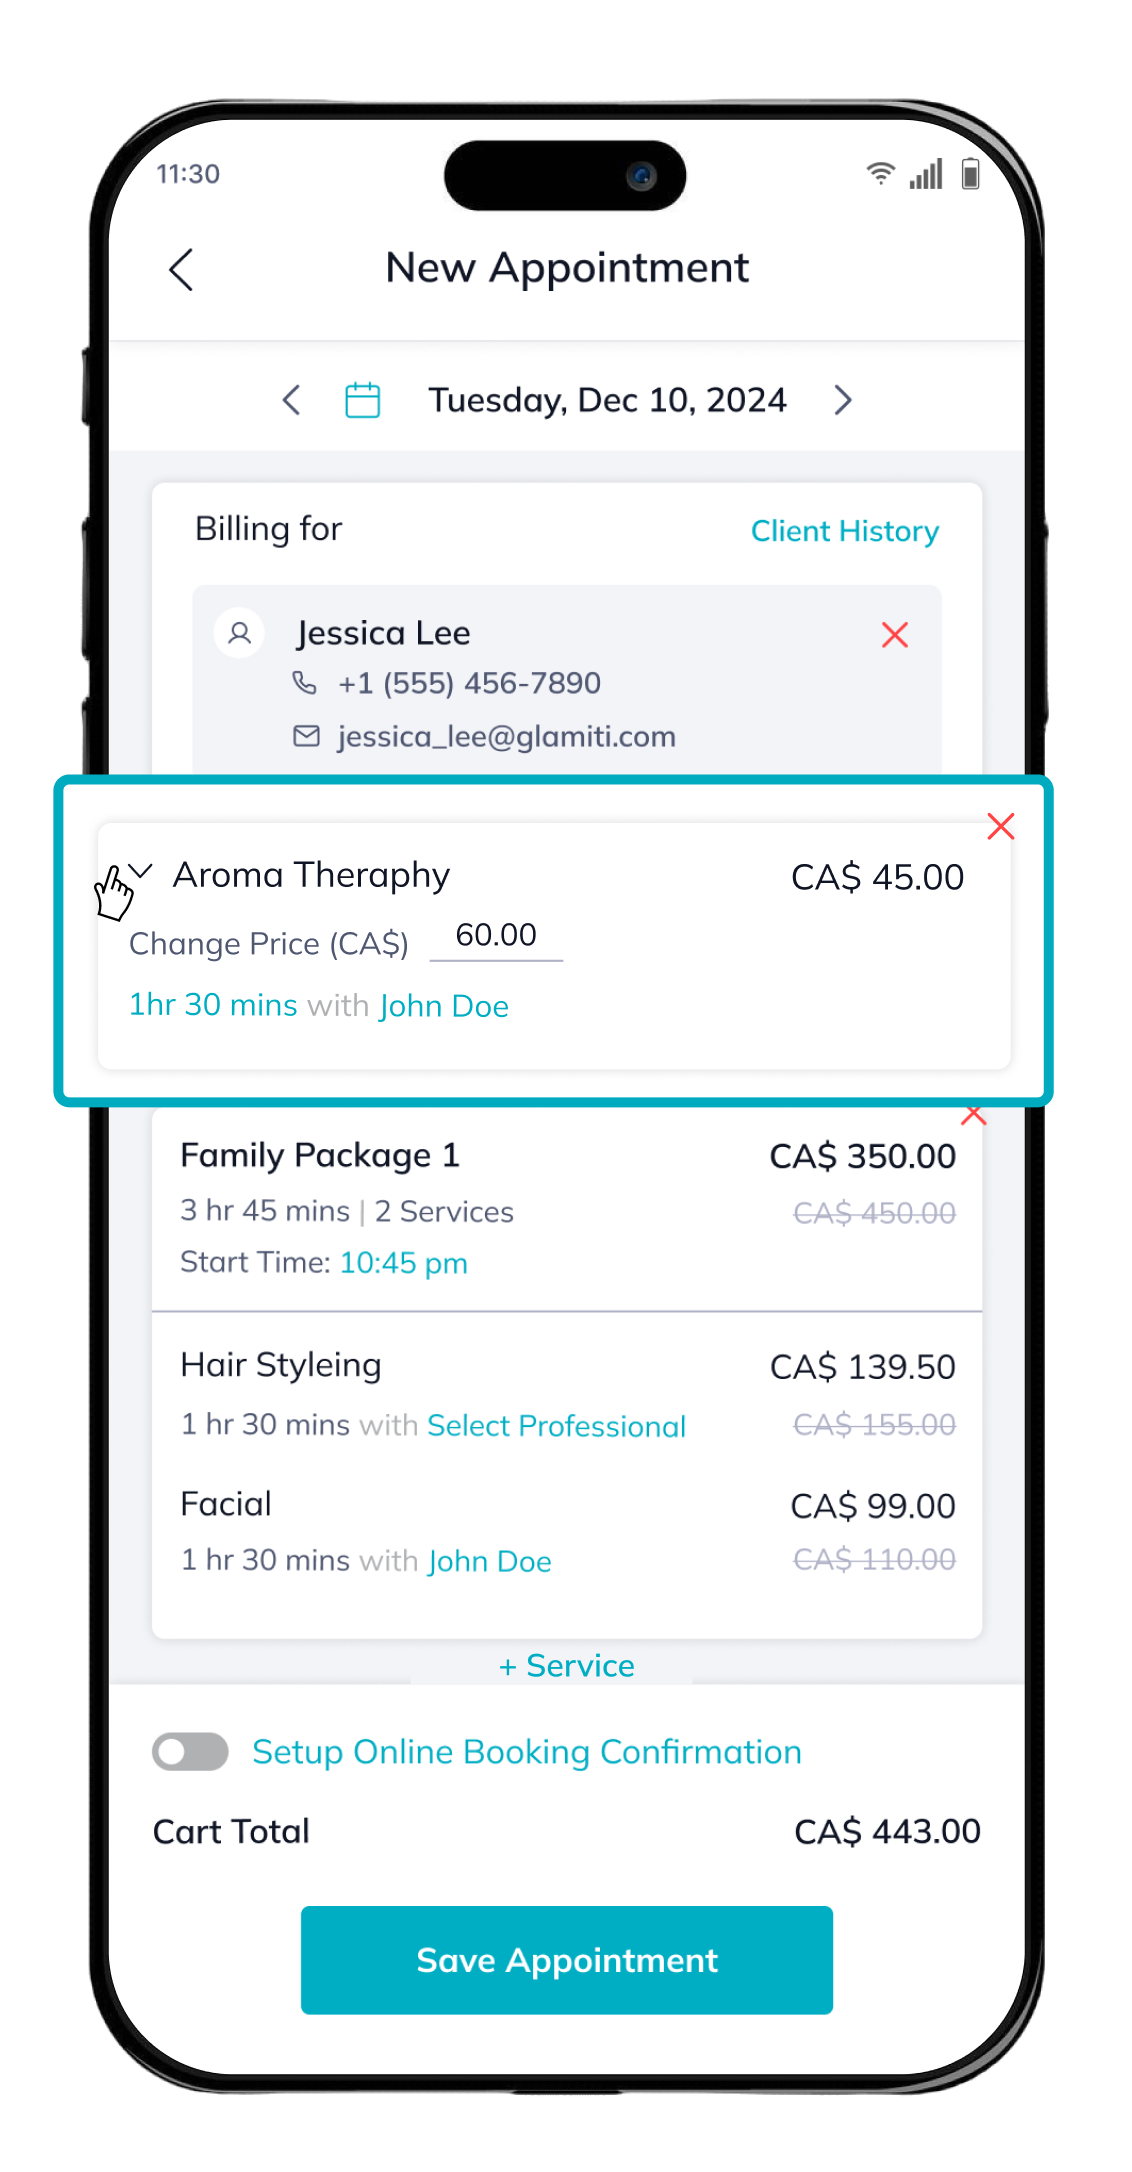
- After adding service/s, tap the drop-down button next to the item.
- Enter a new price; the service price updates automatically.
- The updated price becomes the reference value and applies only to that appointment.
Make a New Sale
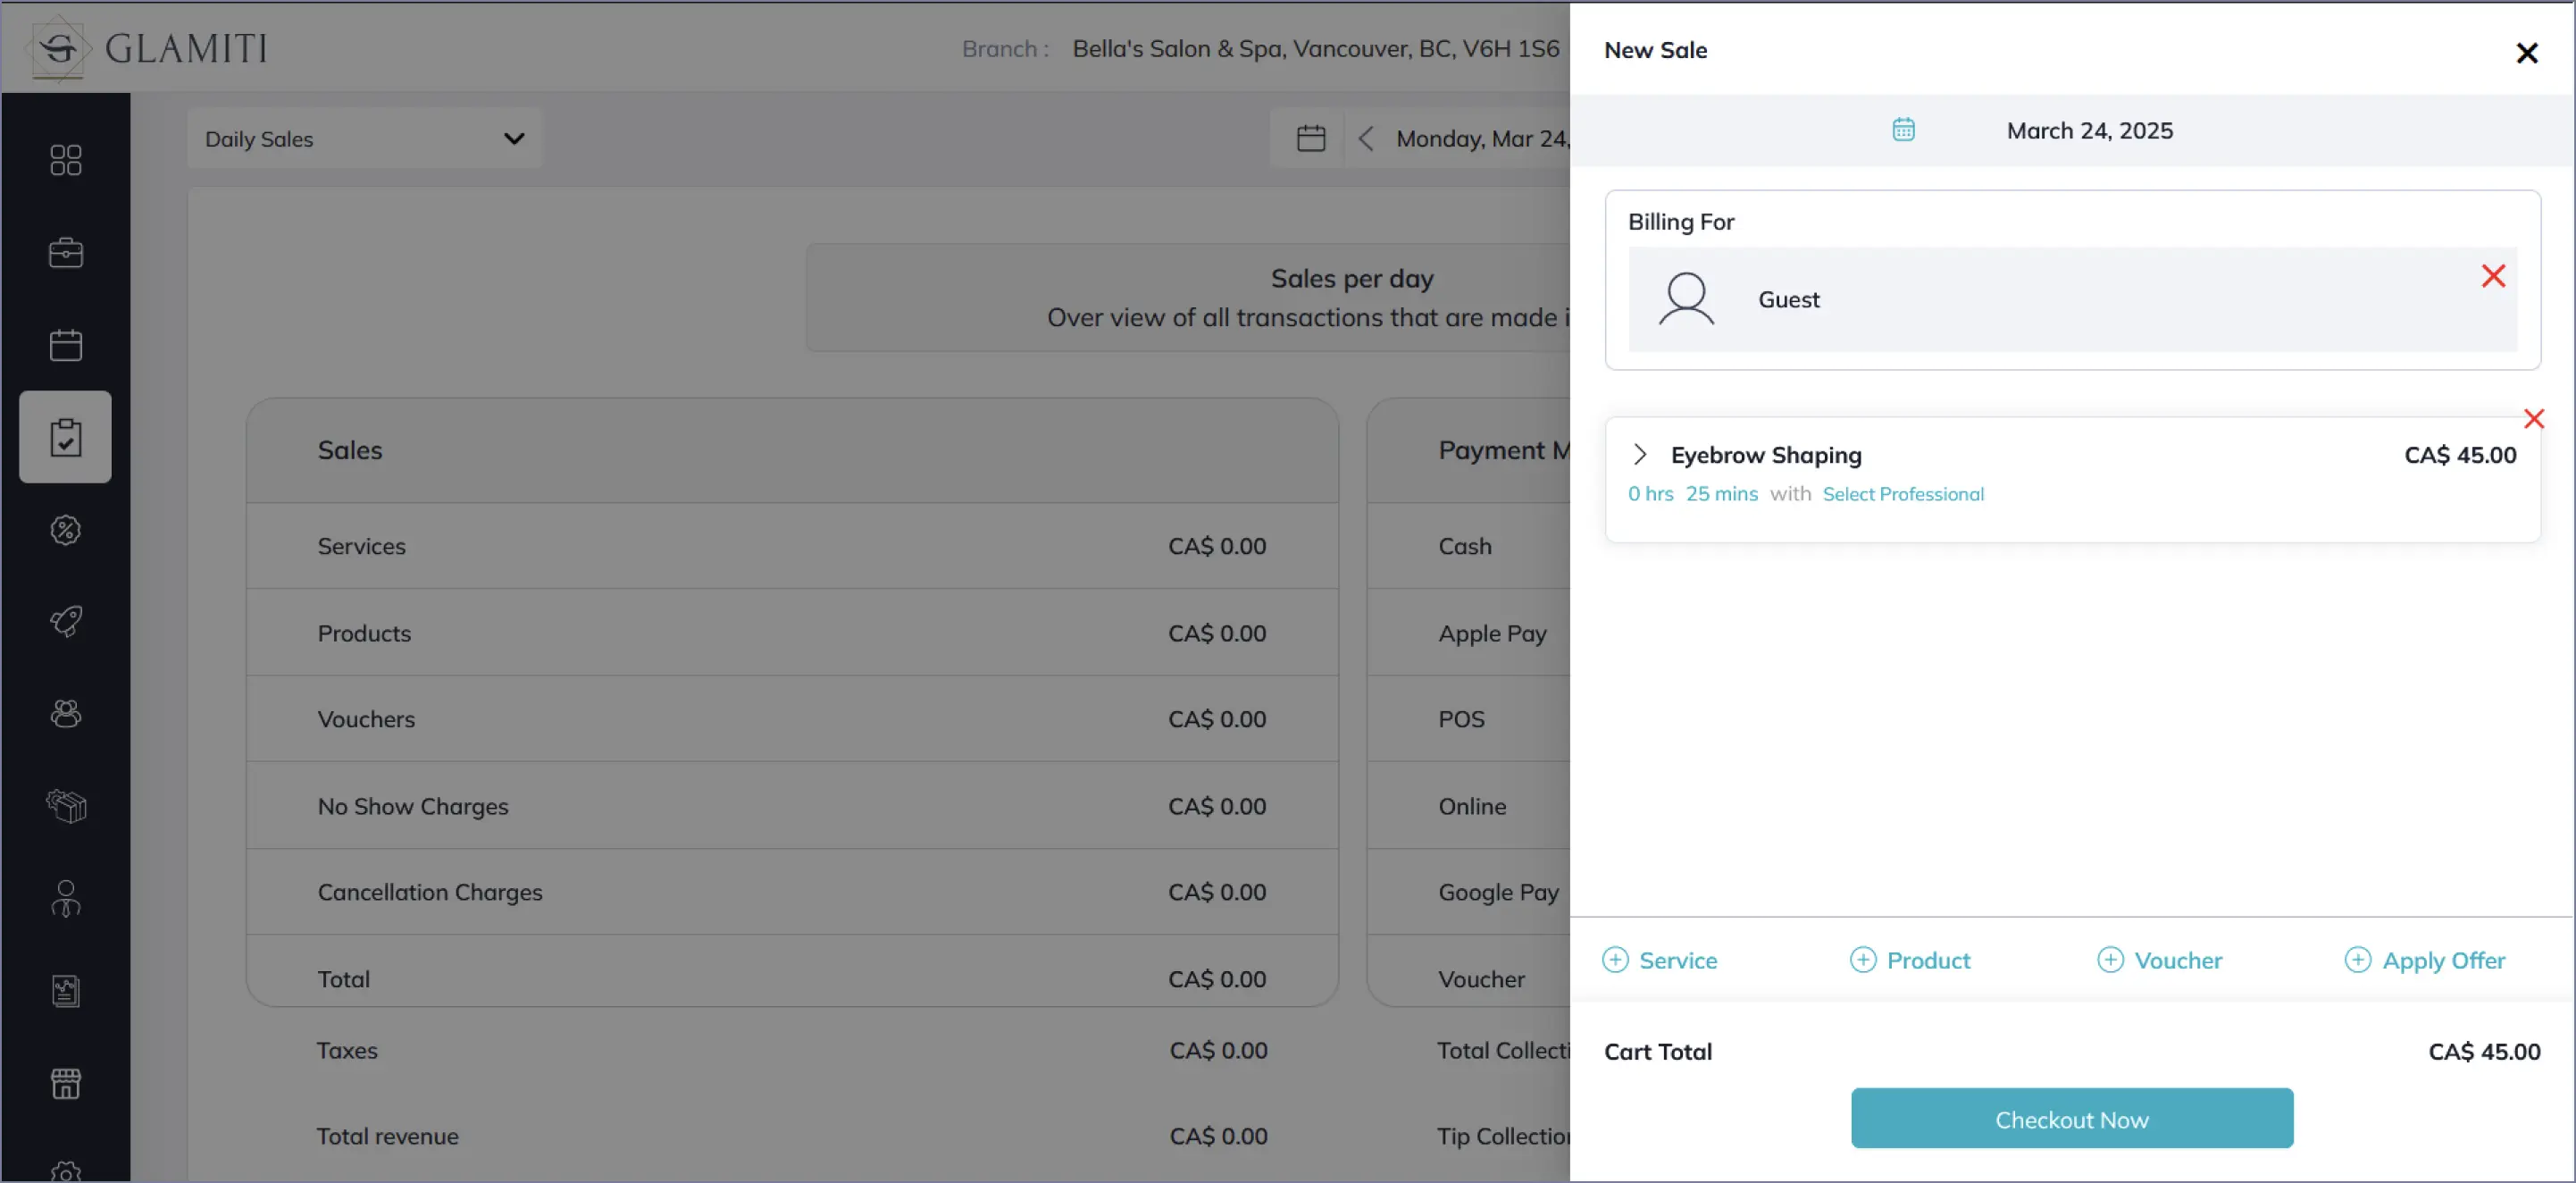
- Click "Add New" from the top-right corner of the calendar and select "New Sale".
- Choose a client or keep it as "Guest" (default option).
- Modify prices for services and products if needed (voucher prices cannot be modified).
- Apply an offer if applicable.
- Click "Check Out", then select a payment method on the next screen to complete the sale.
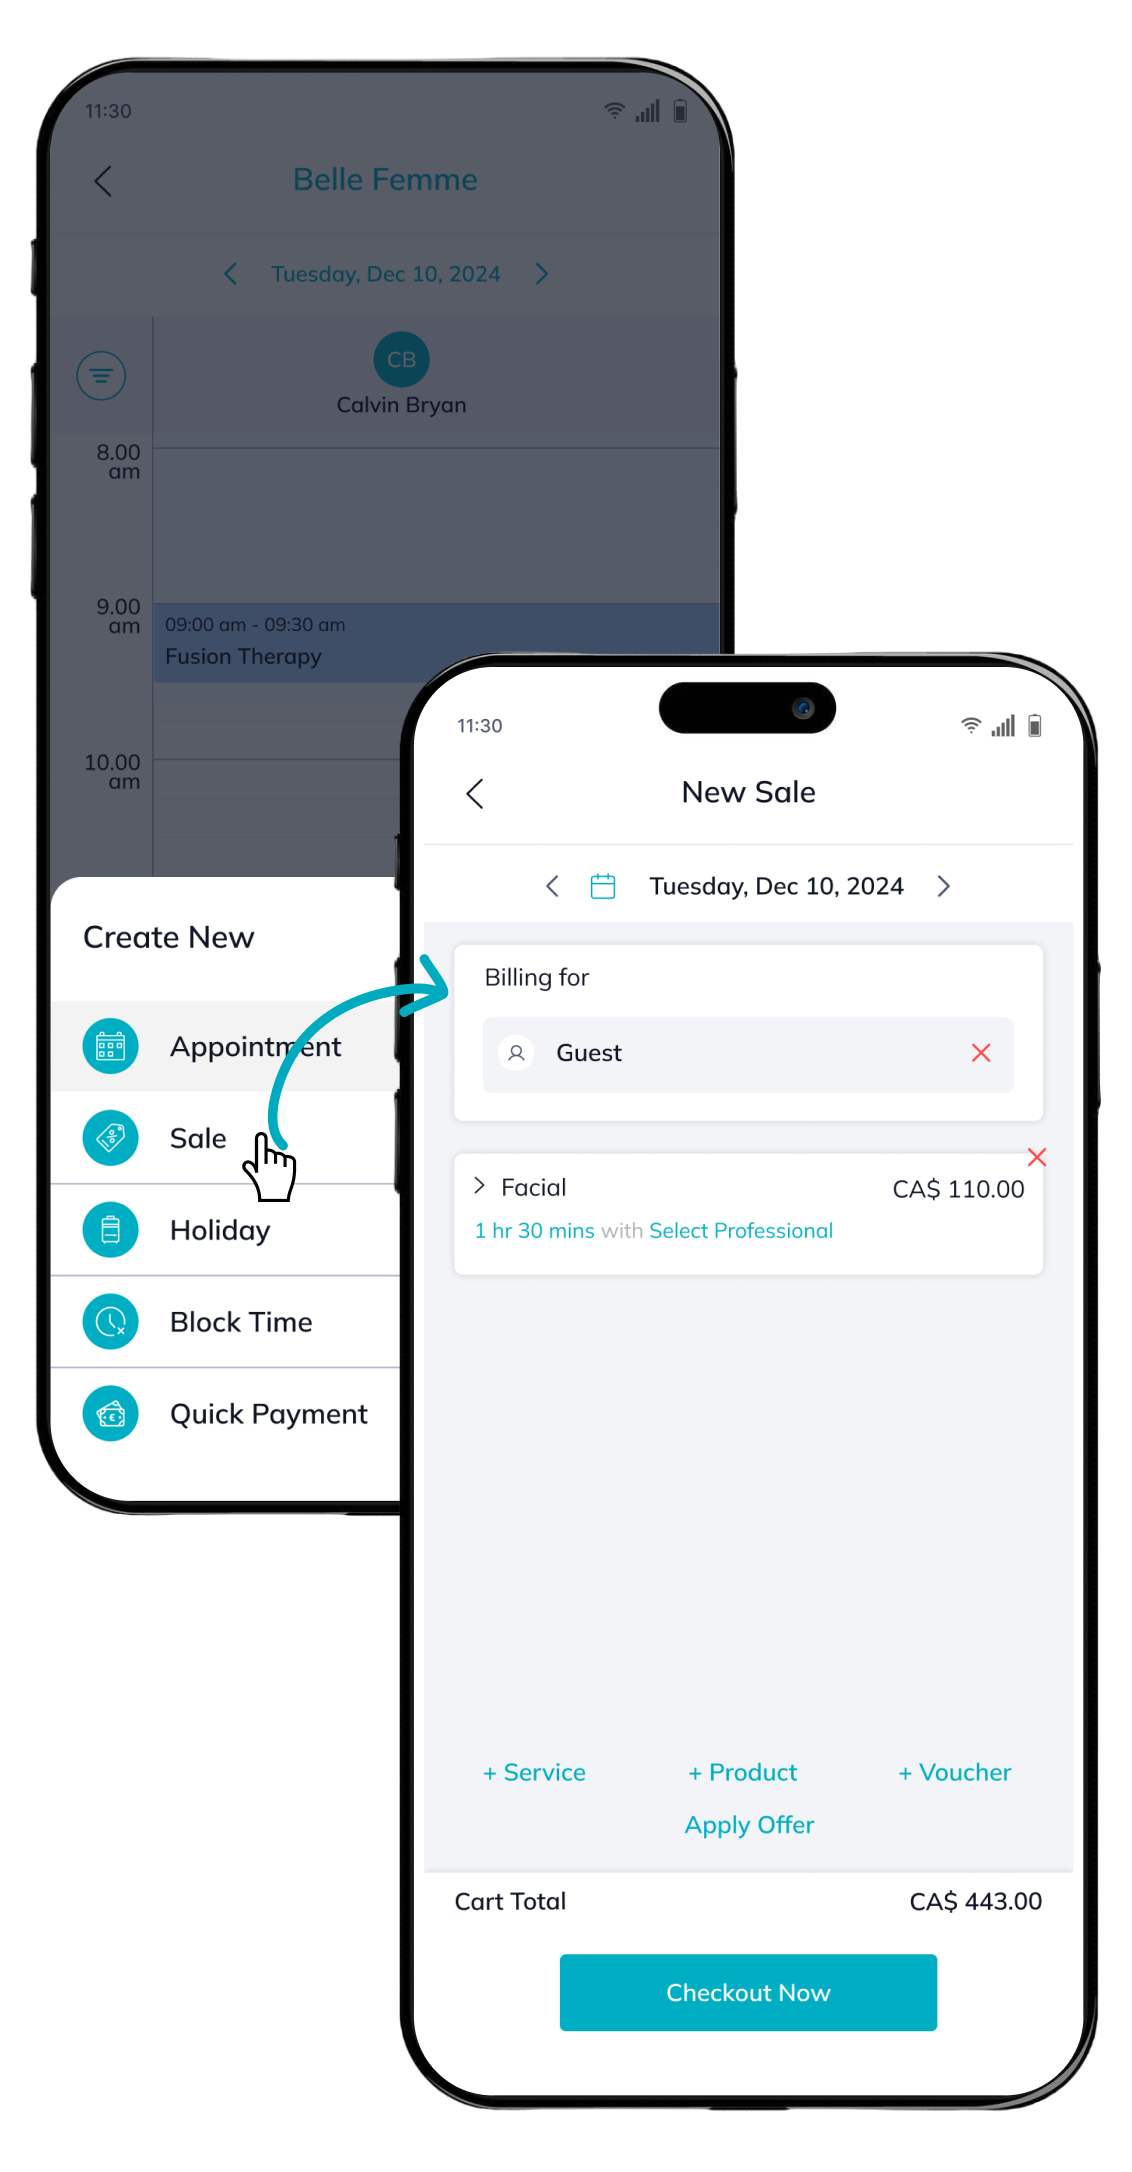
- Tap the plus icon "+" at the bottom of the screen and select "Sale" from the list.
- Choose a client or keep it as "Guest" (default option).
- Add items (services, products, vouchers) to the cart.
- Modify prices for services and products if needed (voucher prices cannot be modified).
- Apply an offer if applicable.
- Tap "Check Out", then select a payment method on the next screen to complete the sale.
Apply Offers
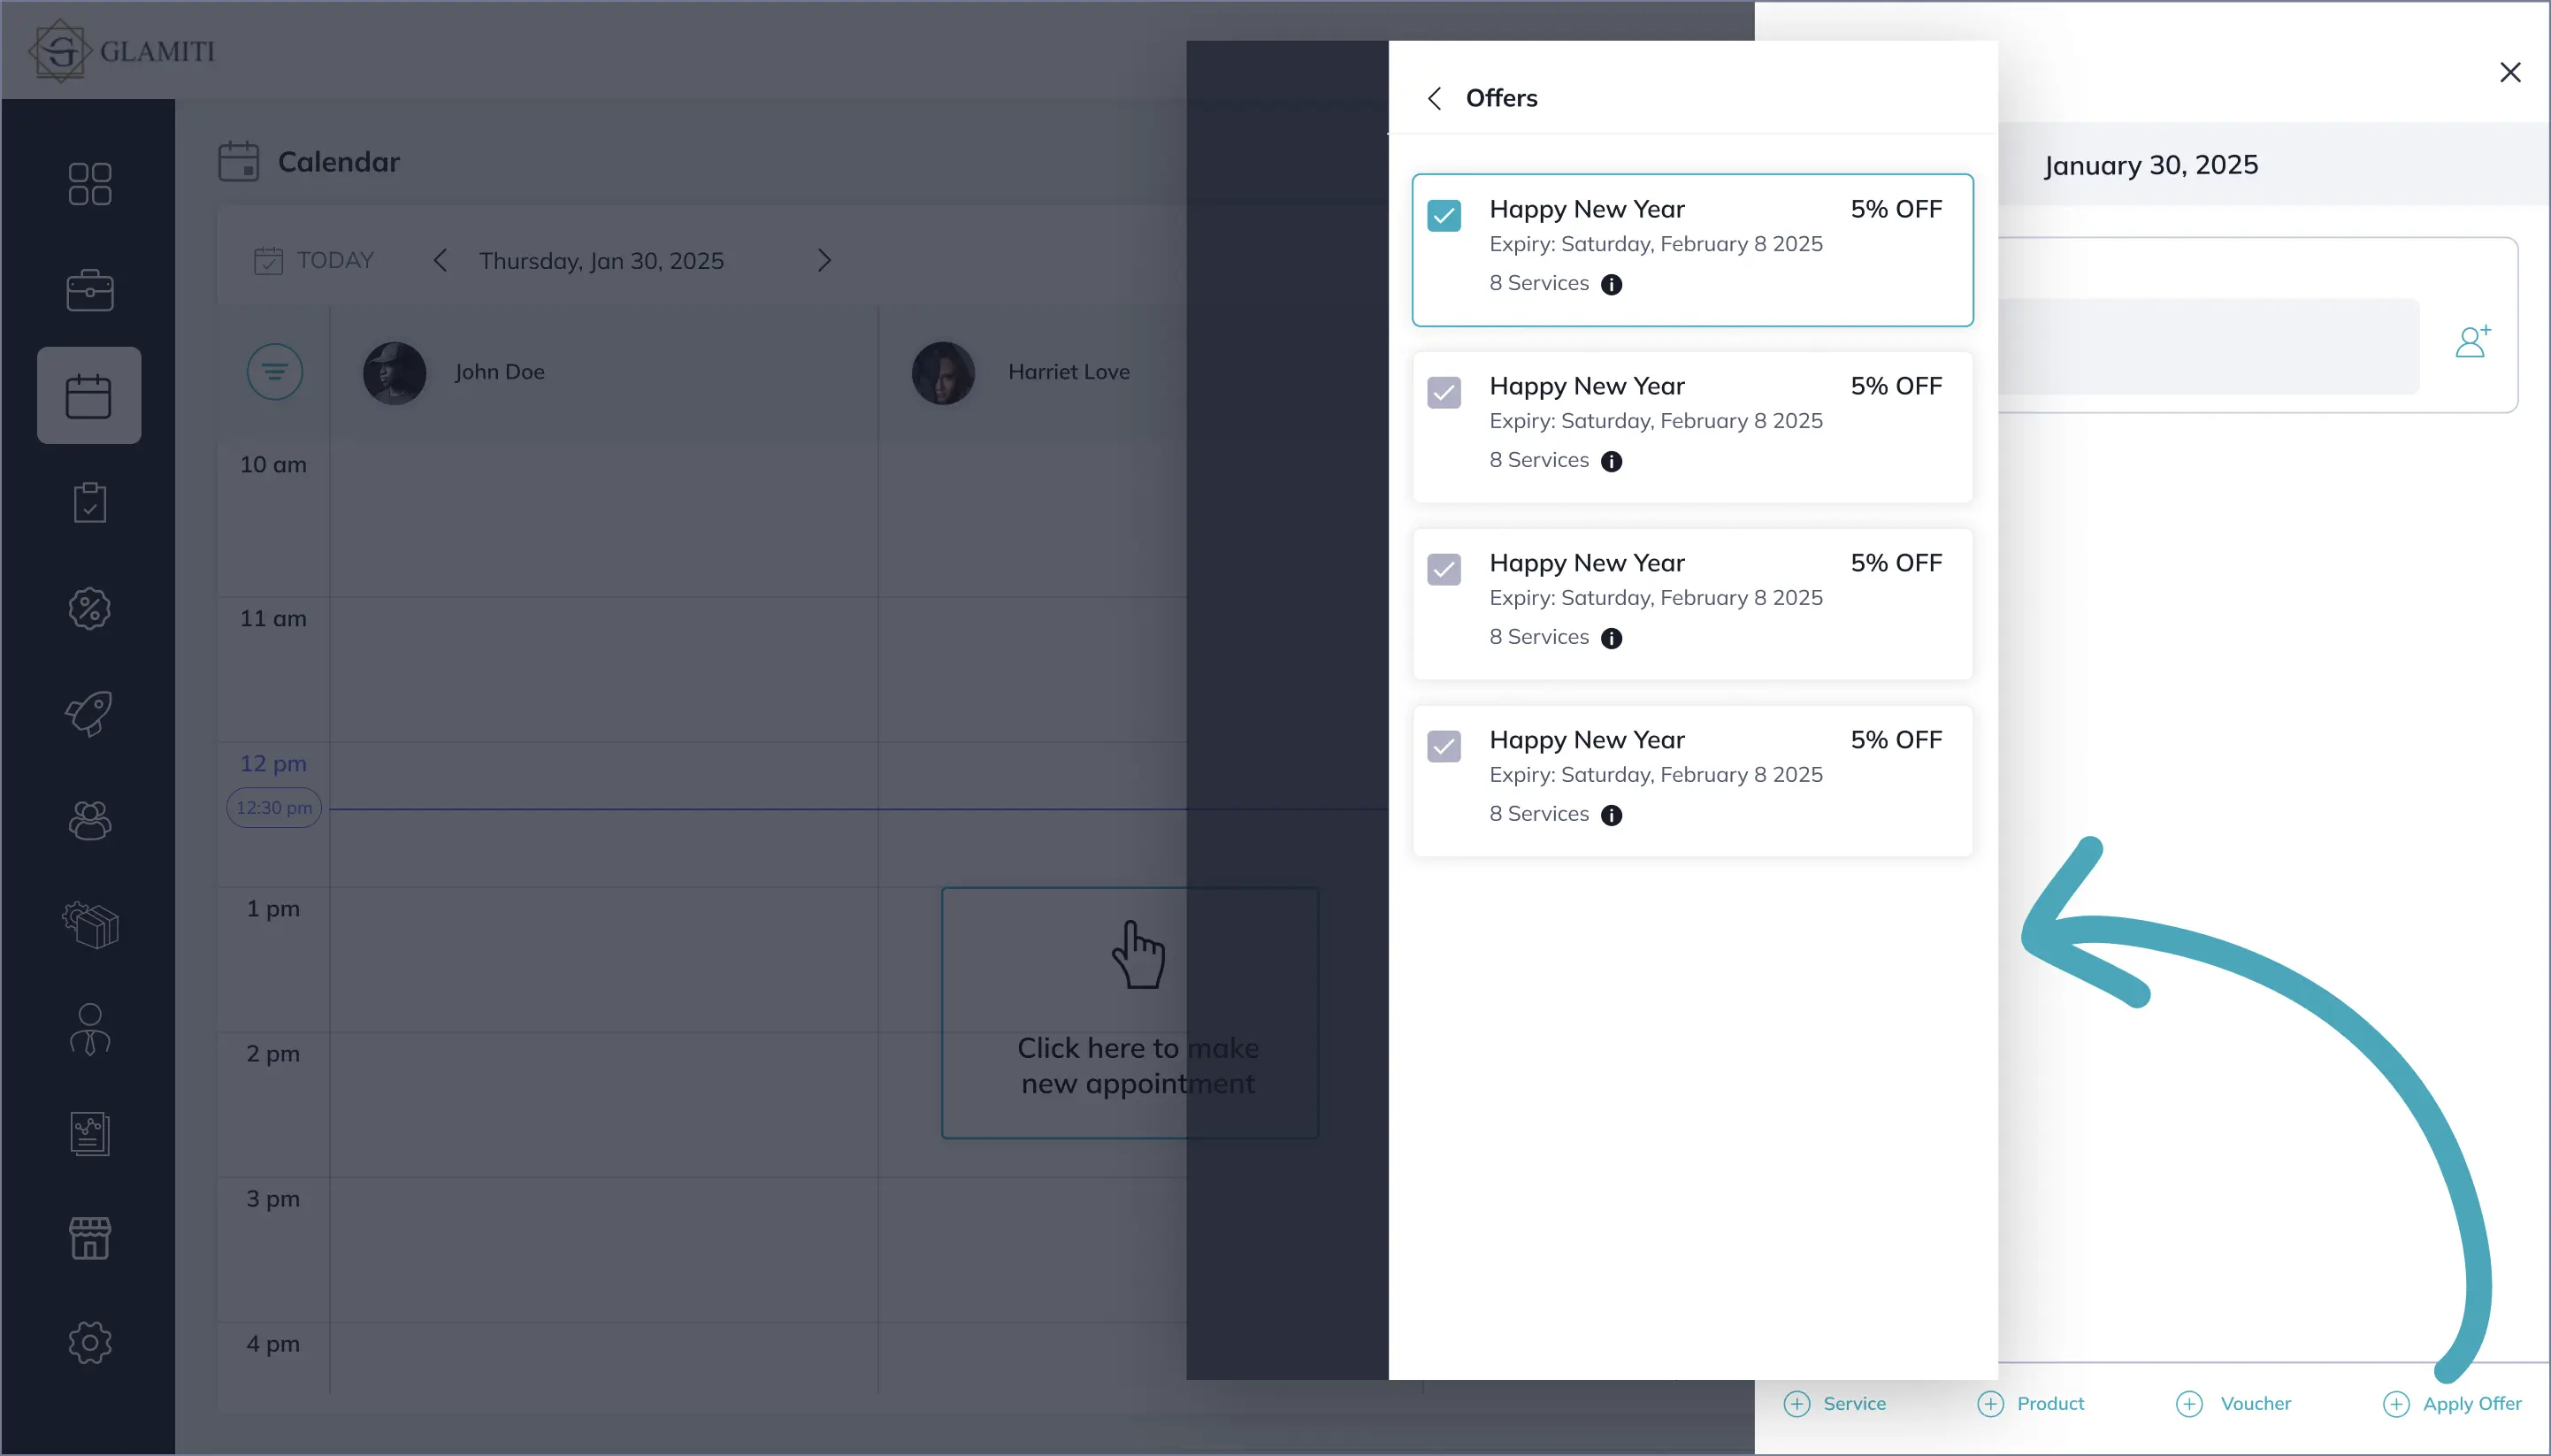
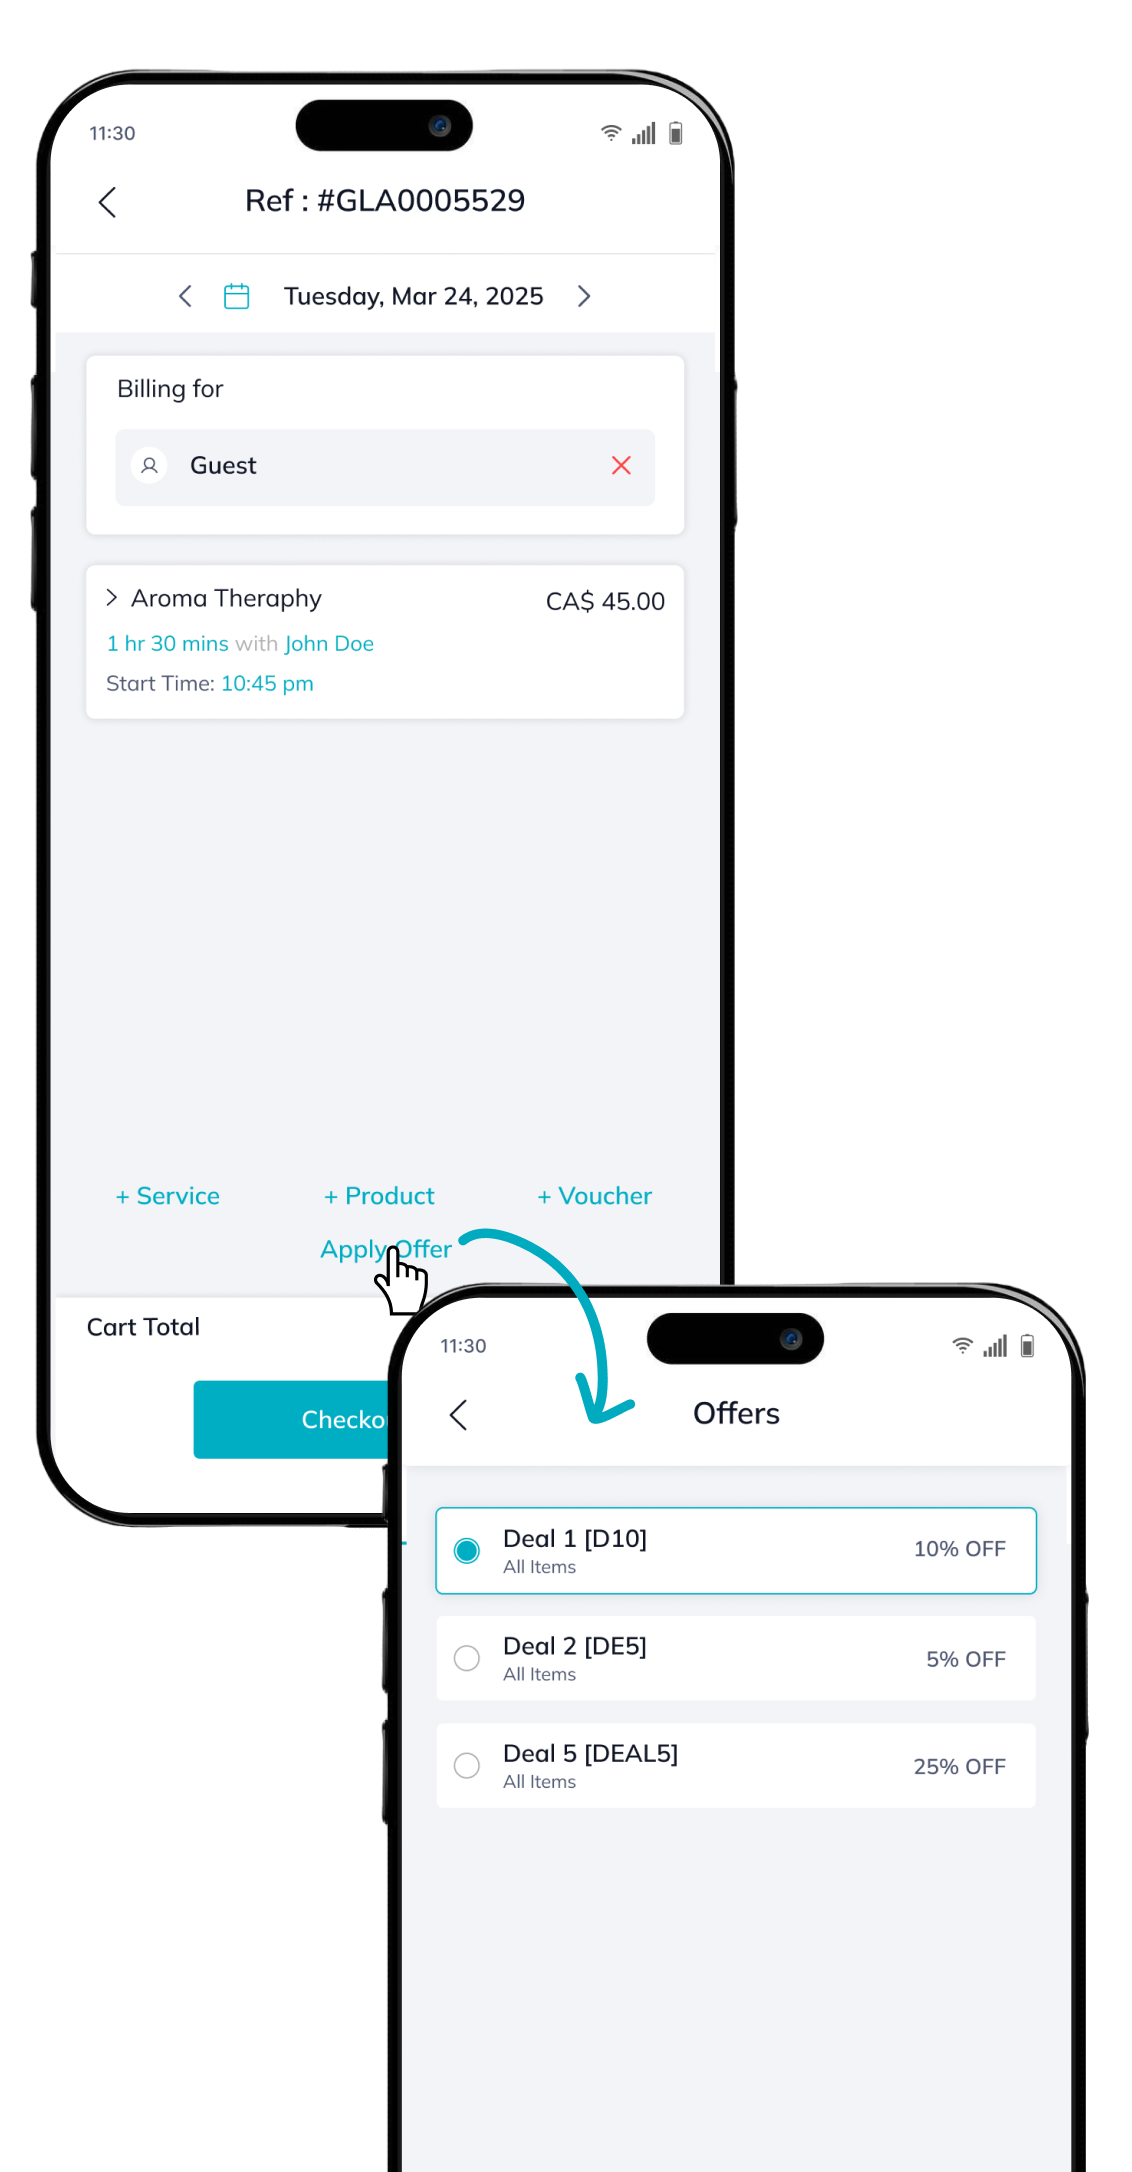
Easily apply discounts to items (services, products, or vouchers) once they’re added to the cart. Please note that only one discount can be used per transaction.
Types of Discounts
- Daily Offers: Valid for services only.
- Deal Discounts: Can be applied to any item in the cart (services, products, and vouchers).
How to Apply
- Add items to your cart.
- Navigate to the “Offers” section.
- Select an applicable discount apply it to the transaction.
Add Business Holiday
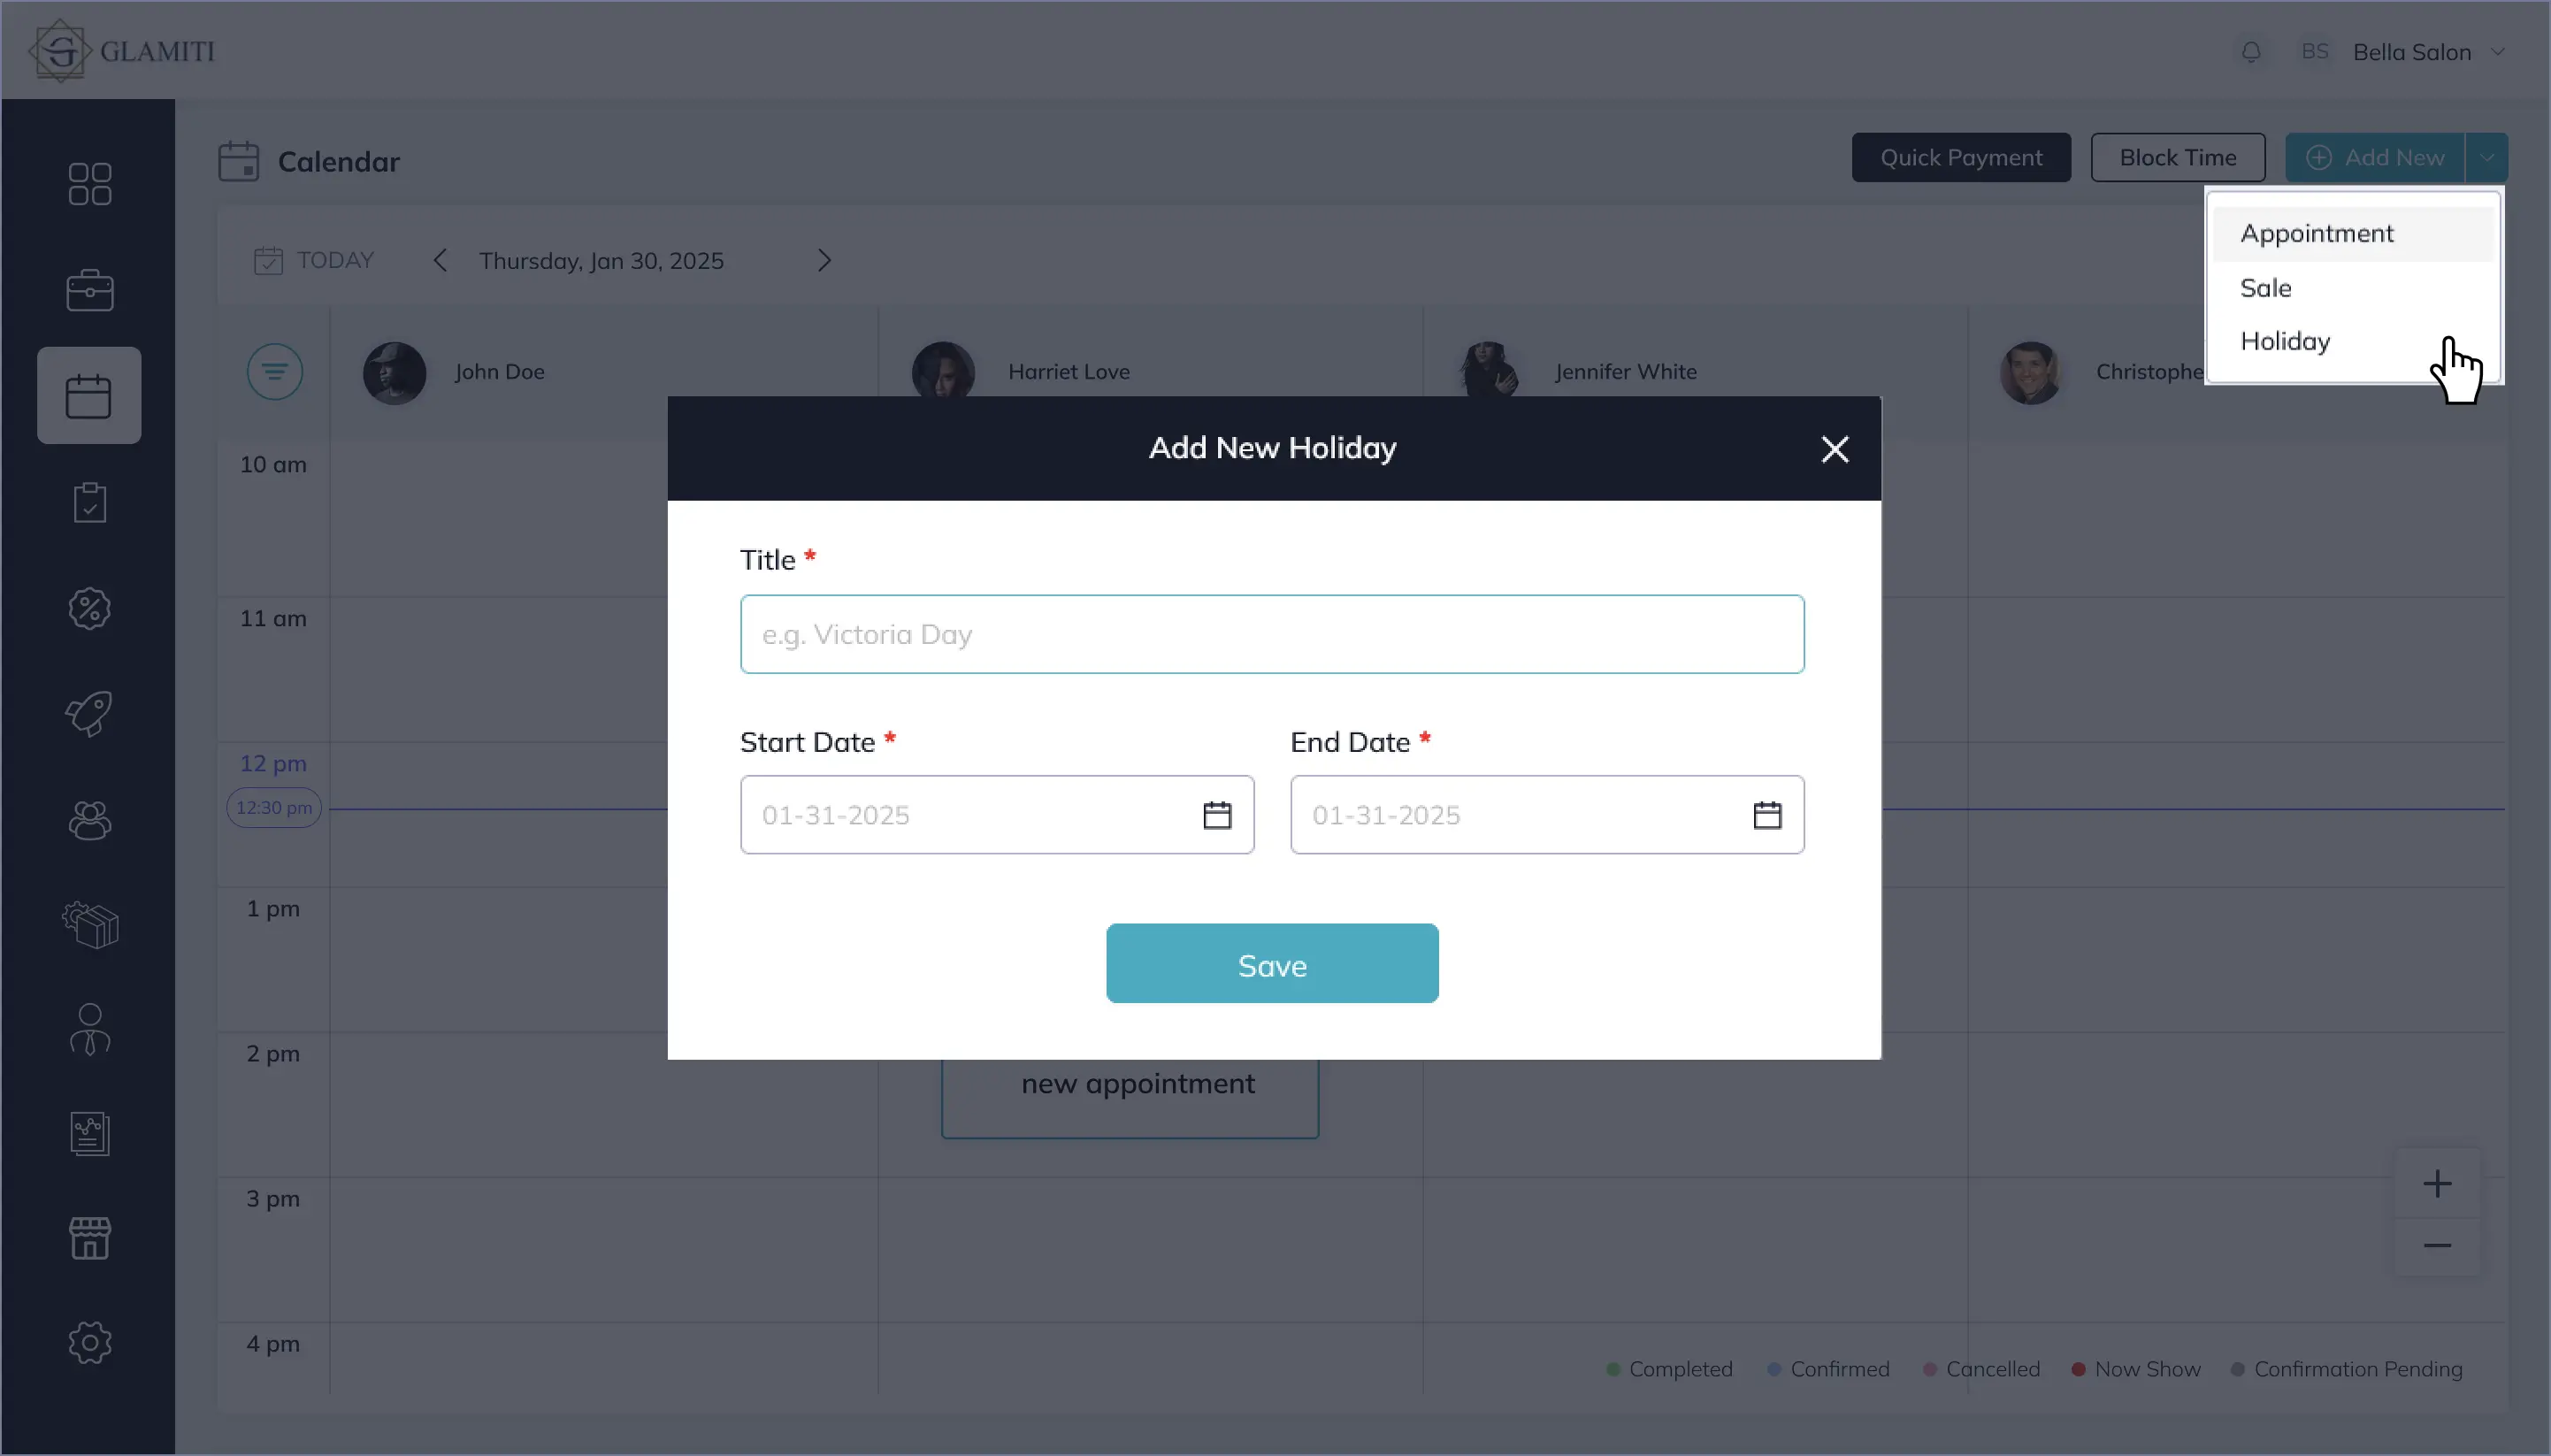
- Click "Add New" from the top-right corner of the calendar and select "Holiday".
- Enter the holiday title, start date, and end date.
- Save the holiday; it will be displayed on the calendar with the title.
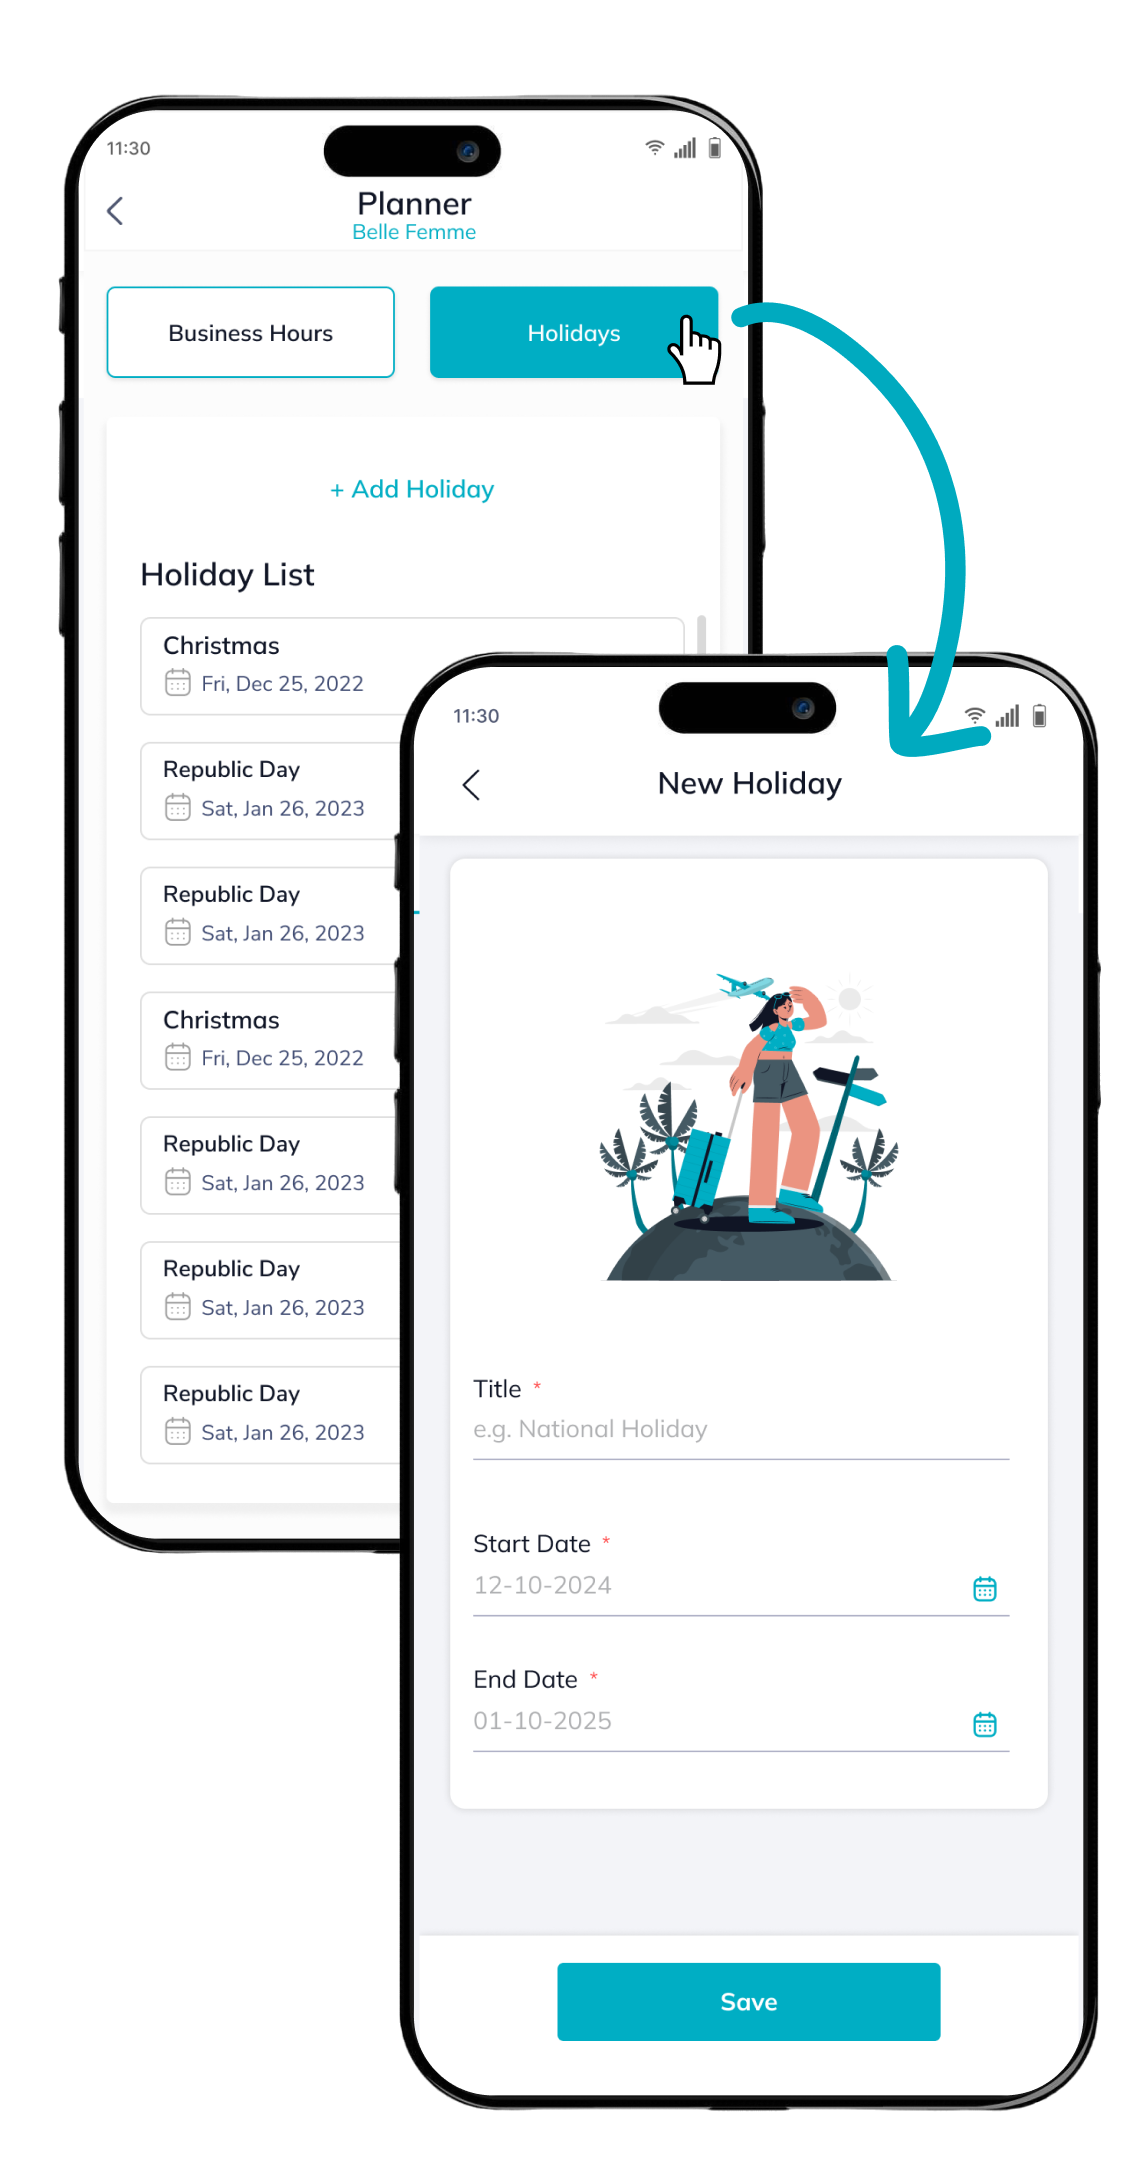
- View the holiday list in the Sub Menu >> Business >> Planner section.
- Tap the plus icon "+" at the bottom of the screen and select "Holiday"from the list.
- Enter the holiday title, start date, and end date.
- Save the holiday; it will be displayed on the calendar with the title.
- View the holiday list in the Sub Menu >> Business >> Planner section.
Add ‘Block Time’ for Professional
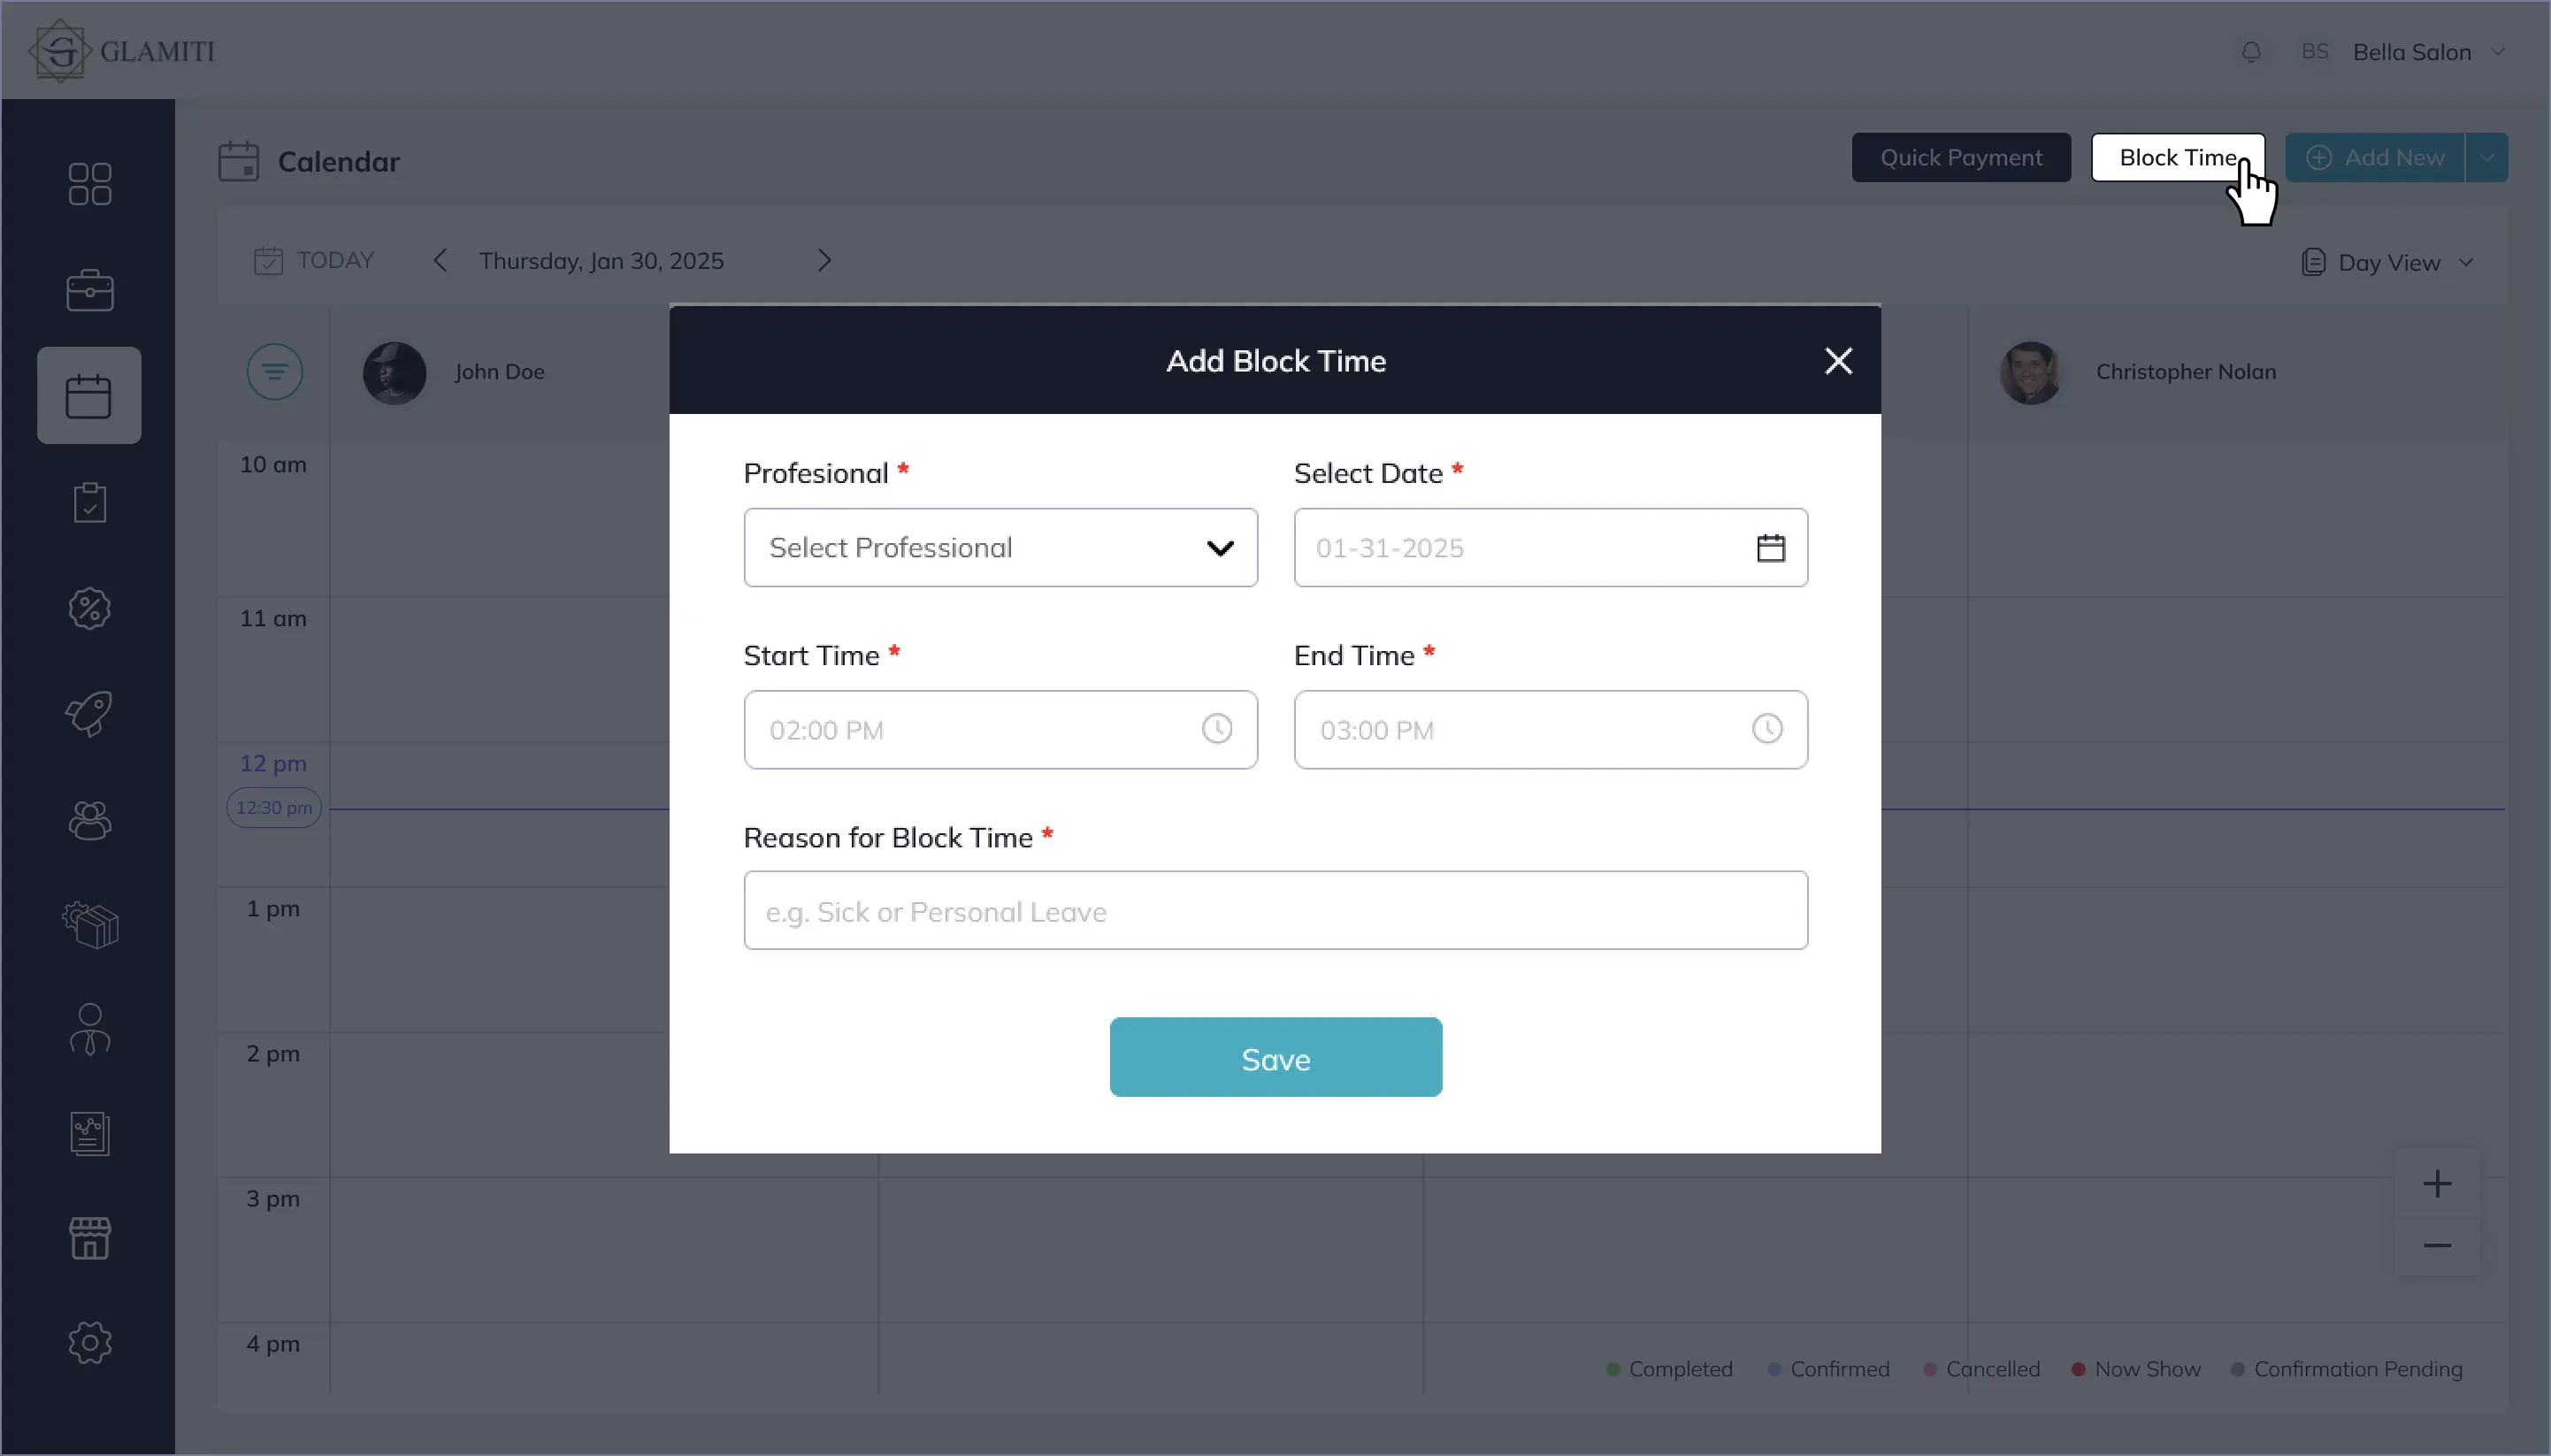
- Click the "Block" button at the top-right corner.
- Select the professional, date, start time, and end date.
- Enter a reason for the block time.
- Save the changes.
- The blocked time will appear as a shaded region on the calendar.
- During block time:
- The professional won’t be available for online bookings.
- Walk-in appointments can still be made for the same professional.
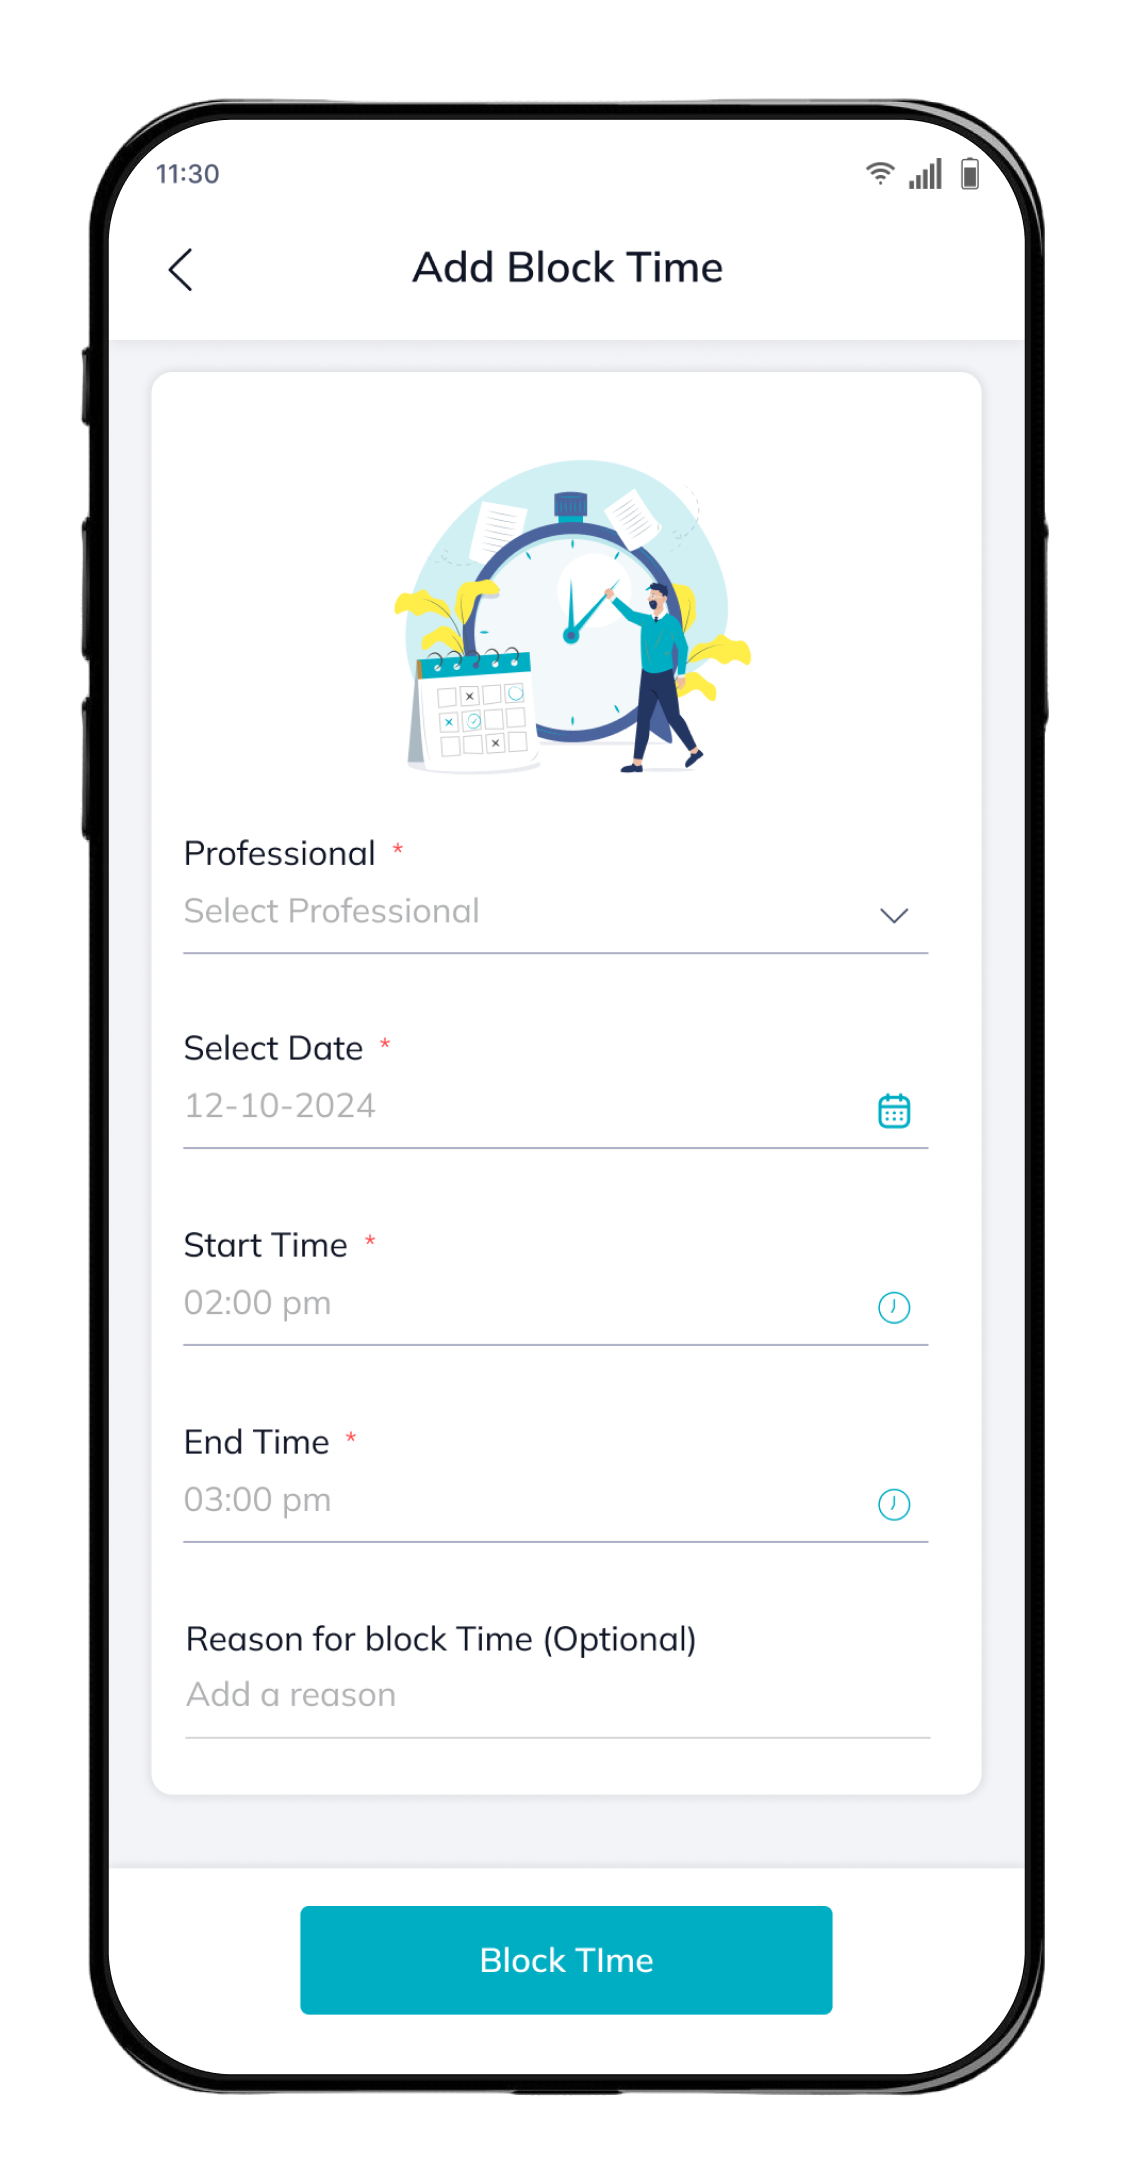
- Tap the plus icon "+" at the bottom of the screen and select "Block Time" from the list.
- Select the professional, date, start time, and end date.
- Enter a reason for the block time.
- Save the changes.
- The blocked time will appear as a shaded region on the calendar.
- During block time:
- The professional won’t be available for online bookings.
- Walk-in appointments can still be made for the same professional.
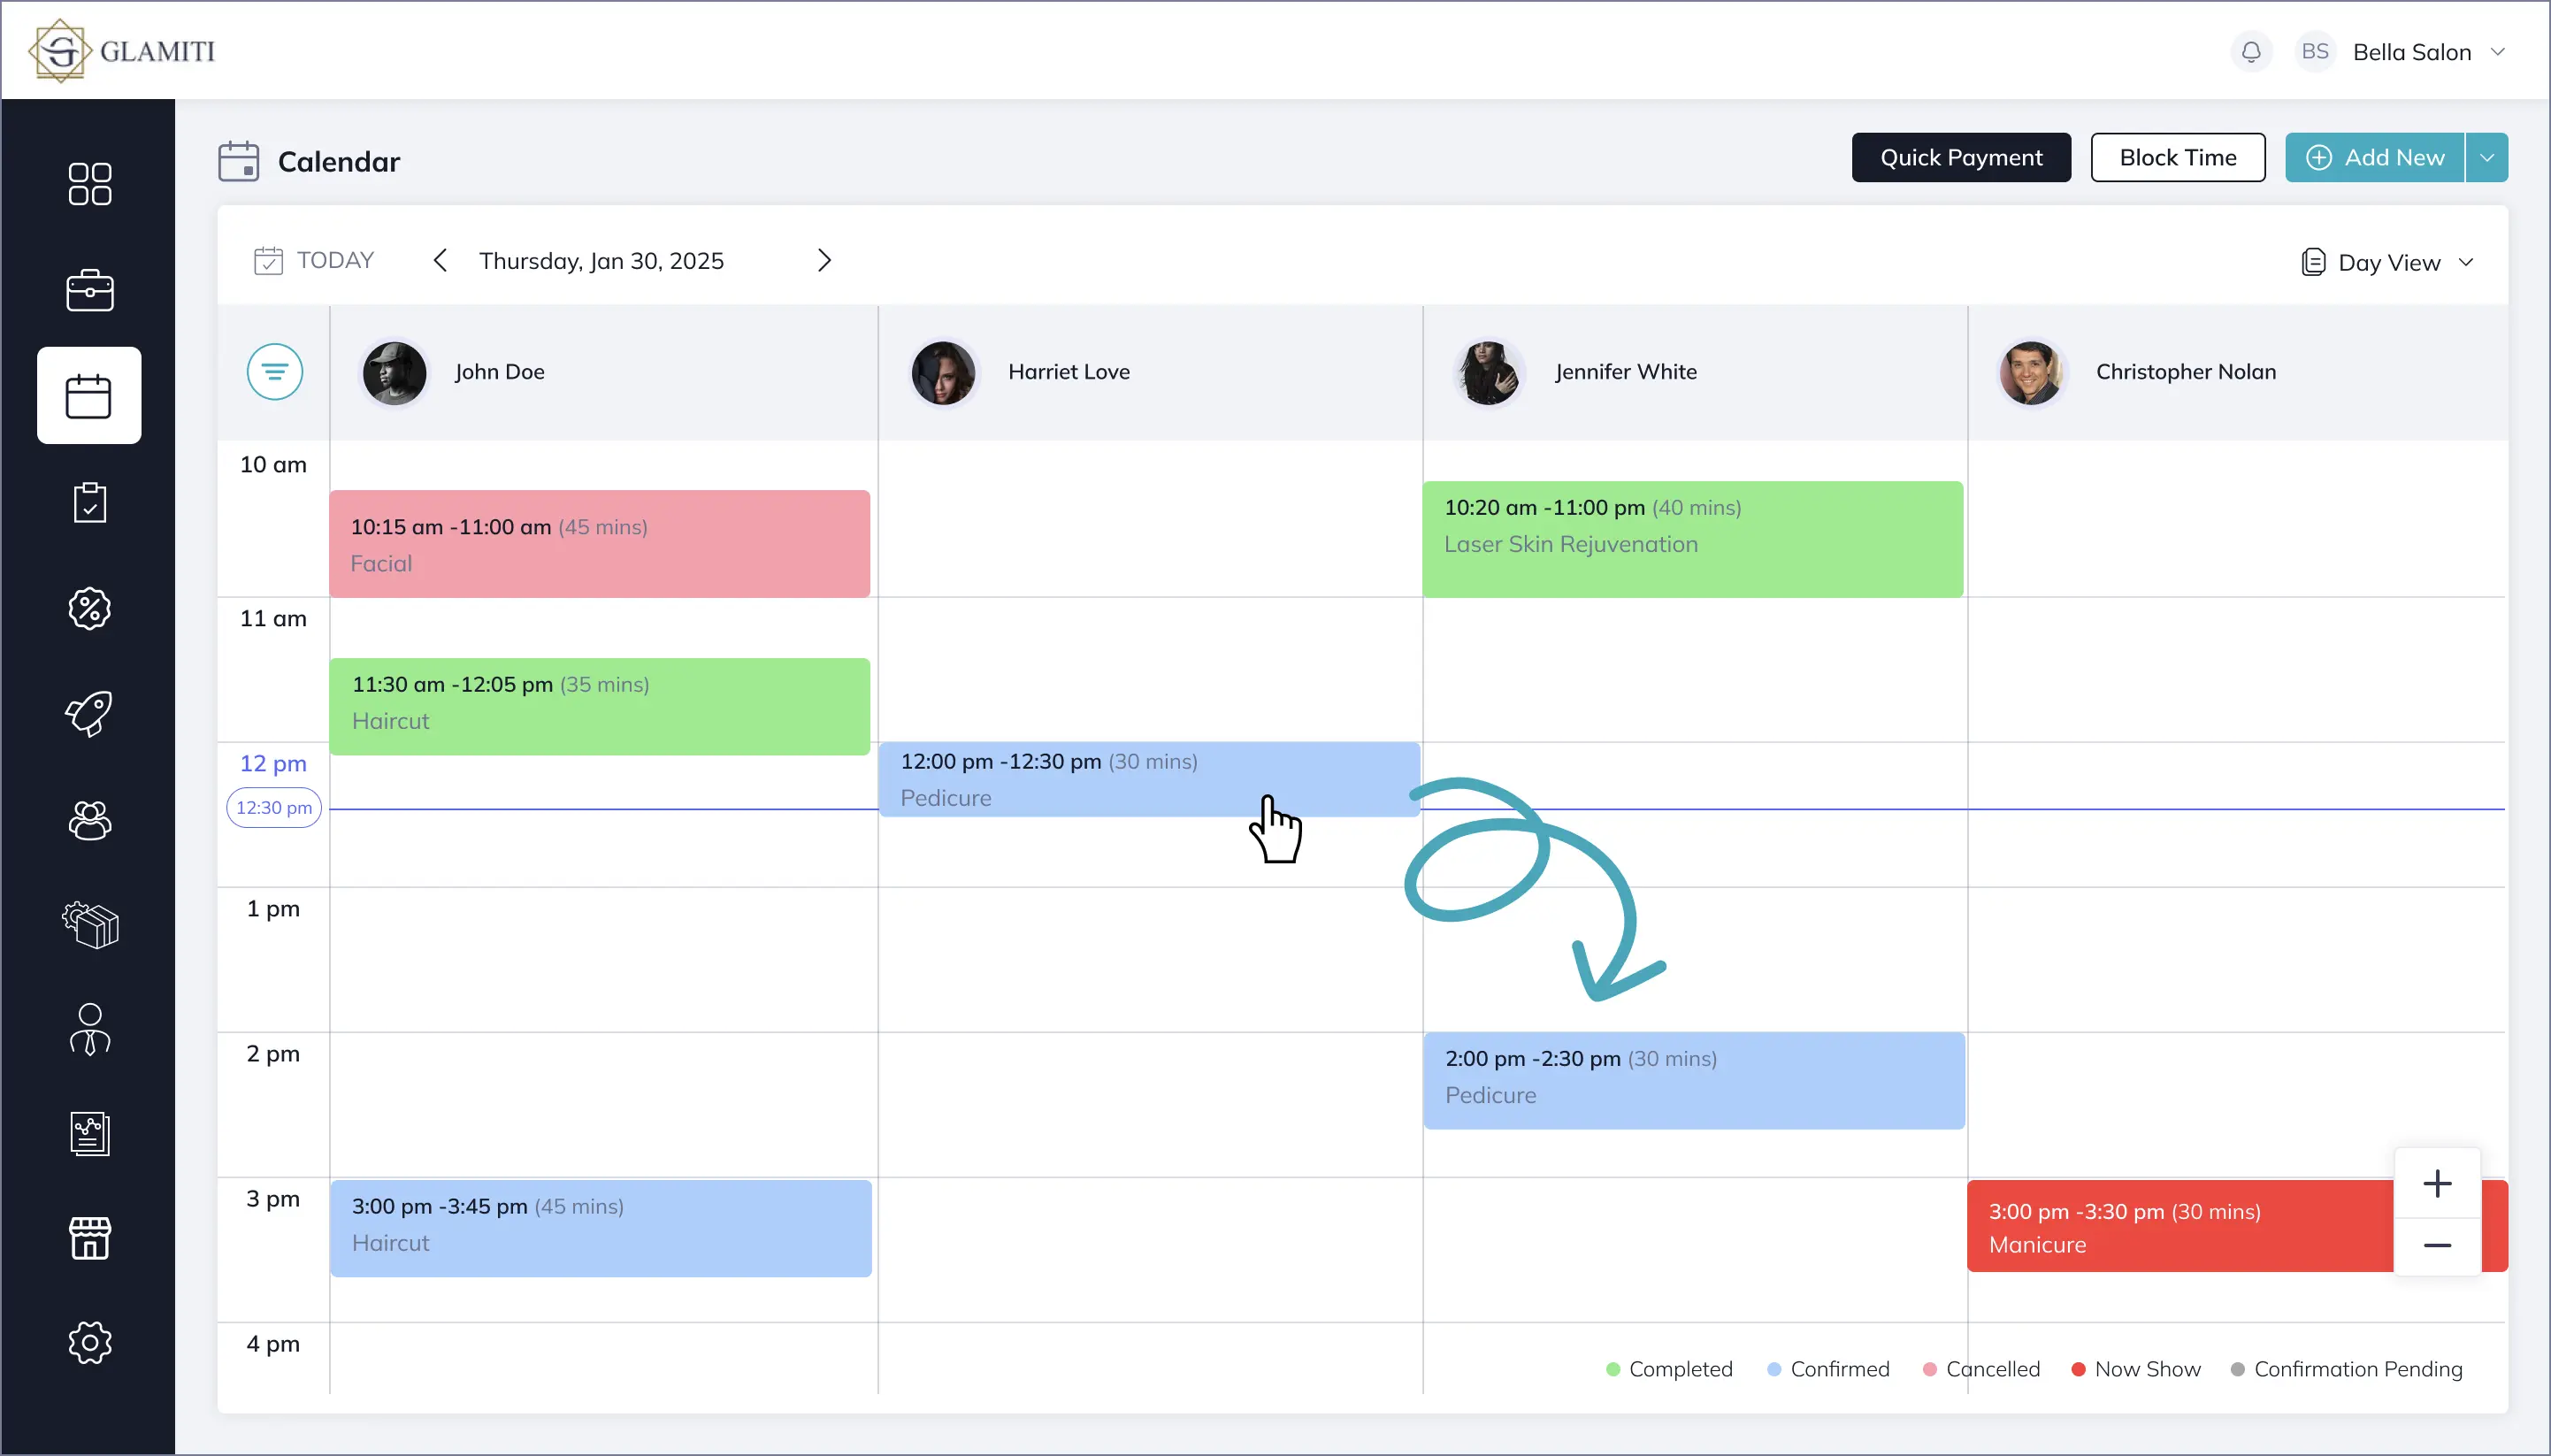
Edit Bookings by ‘Drag & Drop’
-
Day View:
Drag a booked service to another professional’s time slot to change the assigned professional and time.
-
3-Day View & Week View:
- Drag a booked service to another date to reschedule the appointment.
- This allows you to change both the date and assigned professional at once.
-
Adjust Booking Duration:
- Hover over the top or bottom edge of the appointment.
- When the cursor changes shape, drag to extend or shorten the booking duration.
- The updated duration will be automatically applied to the appointment.
Note:
-
Restrictions on Packages:
- A service that is part of a package cannot be dragged to another date.
- However, it can be moved to another professional’s time slot to change the assigned professional.
-
Restrictions on Online Bookings:
Appointments booked online cannot be rescheduled using the drag-and-drop feature.
-
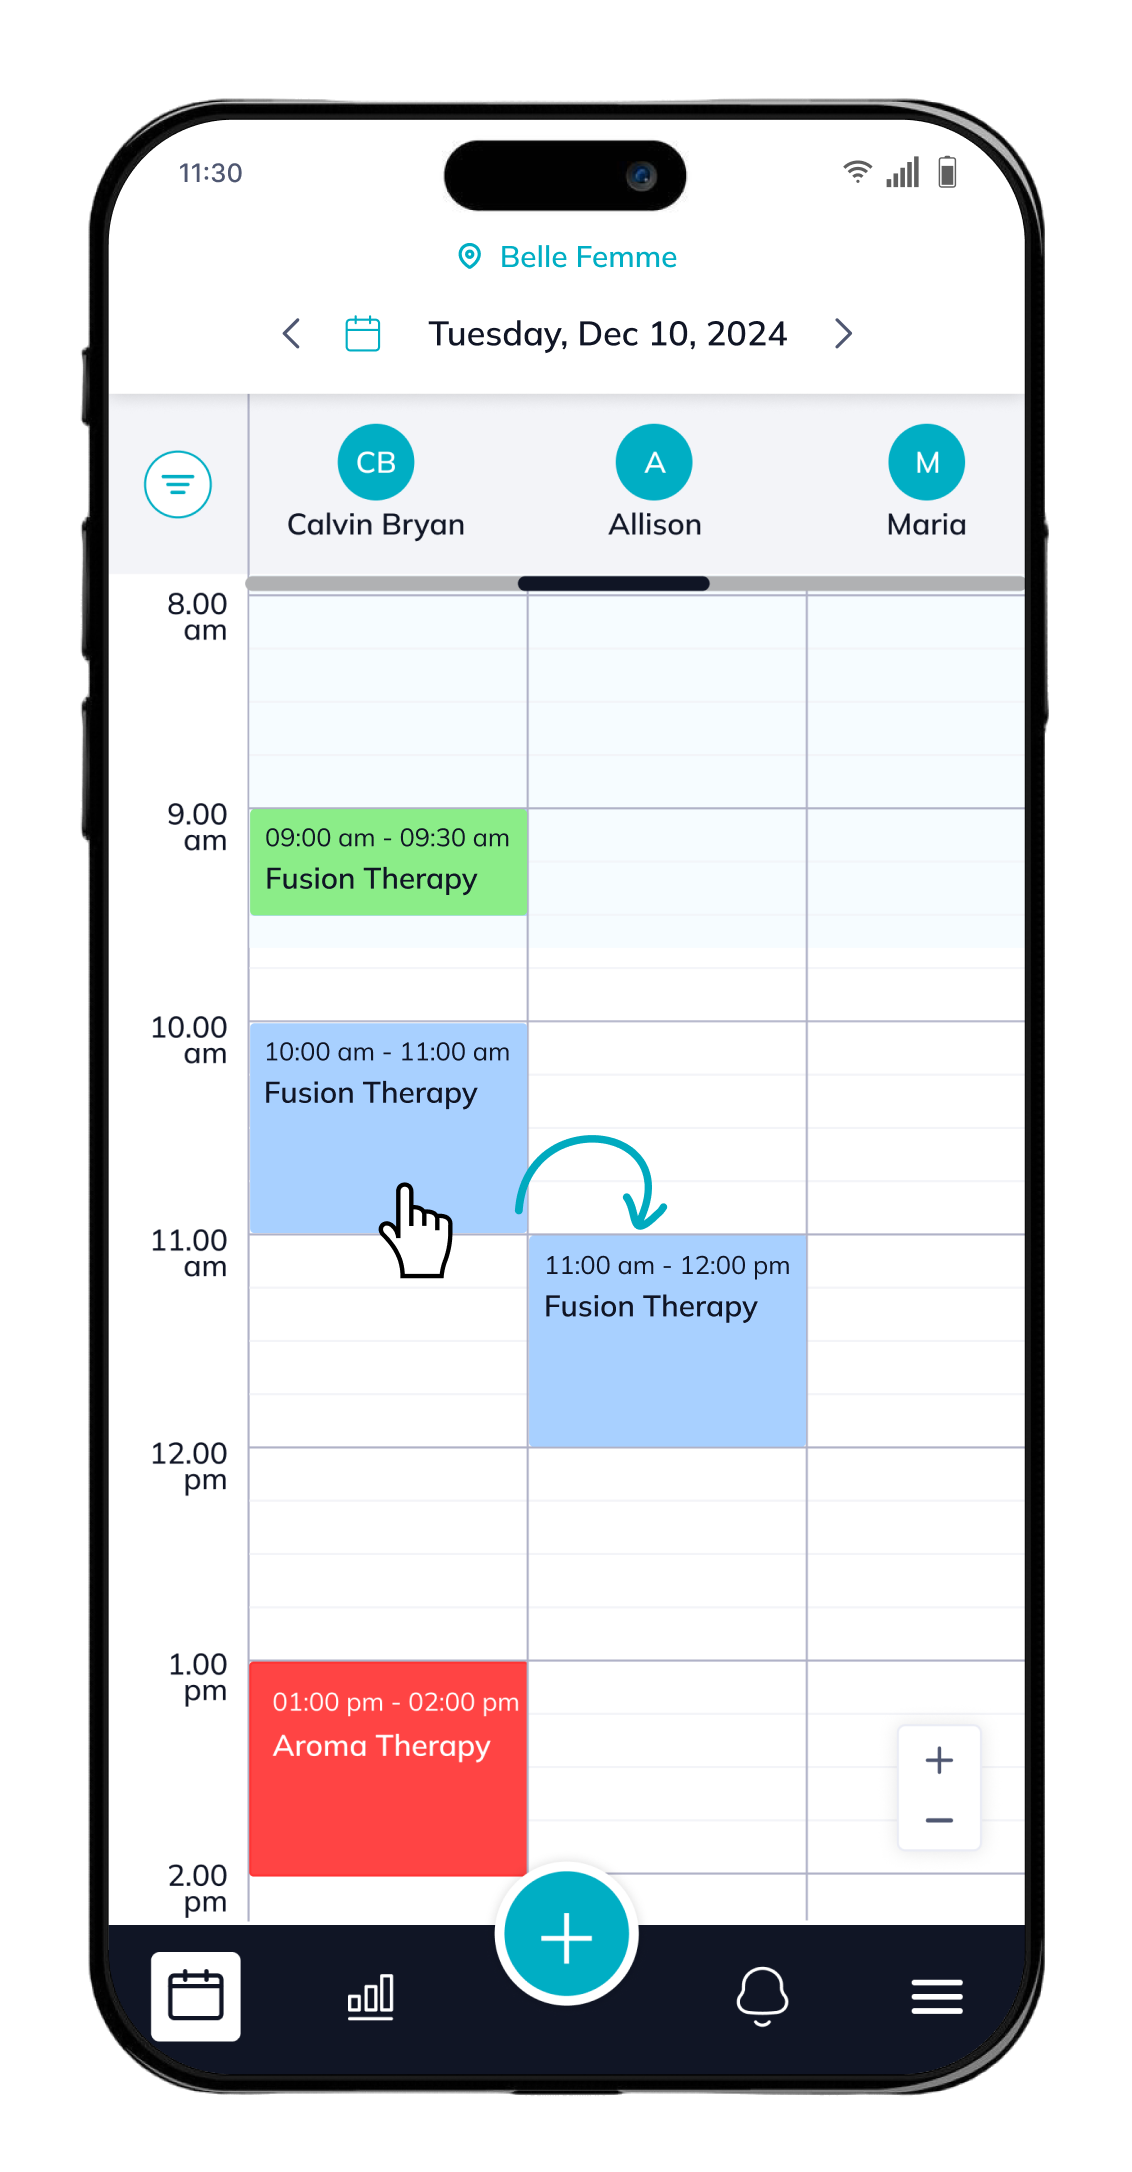
Day View:
Long press the booking for one second, then drag it to another professional’s time slot to change the assigned professional and time.
-
3-Day View & Week View:
- Long press the booking for one second, then drag it to another date to reschedule the appointment.
- This allows you to change both the date and assigned professional at once.
-
Adjust Booking Duration:
- Long press the appointment for one second, then release it.
- Tap the dot, then drag to extend or shorten the booking duration directly on the calendar.
Note:
-
Restrictions on Packages:
- A service that is part of a package cannot be dragged to another date.
- However, it can be moved to another professional’s time slot to change the assigned professional.
-
Restrictions on Online Bookings:
Appointments booked online cannot be rescheduled using the drag-and-drop feature.
Quick Payment Feature
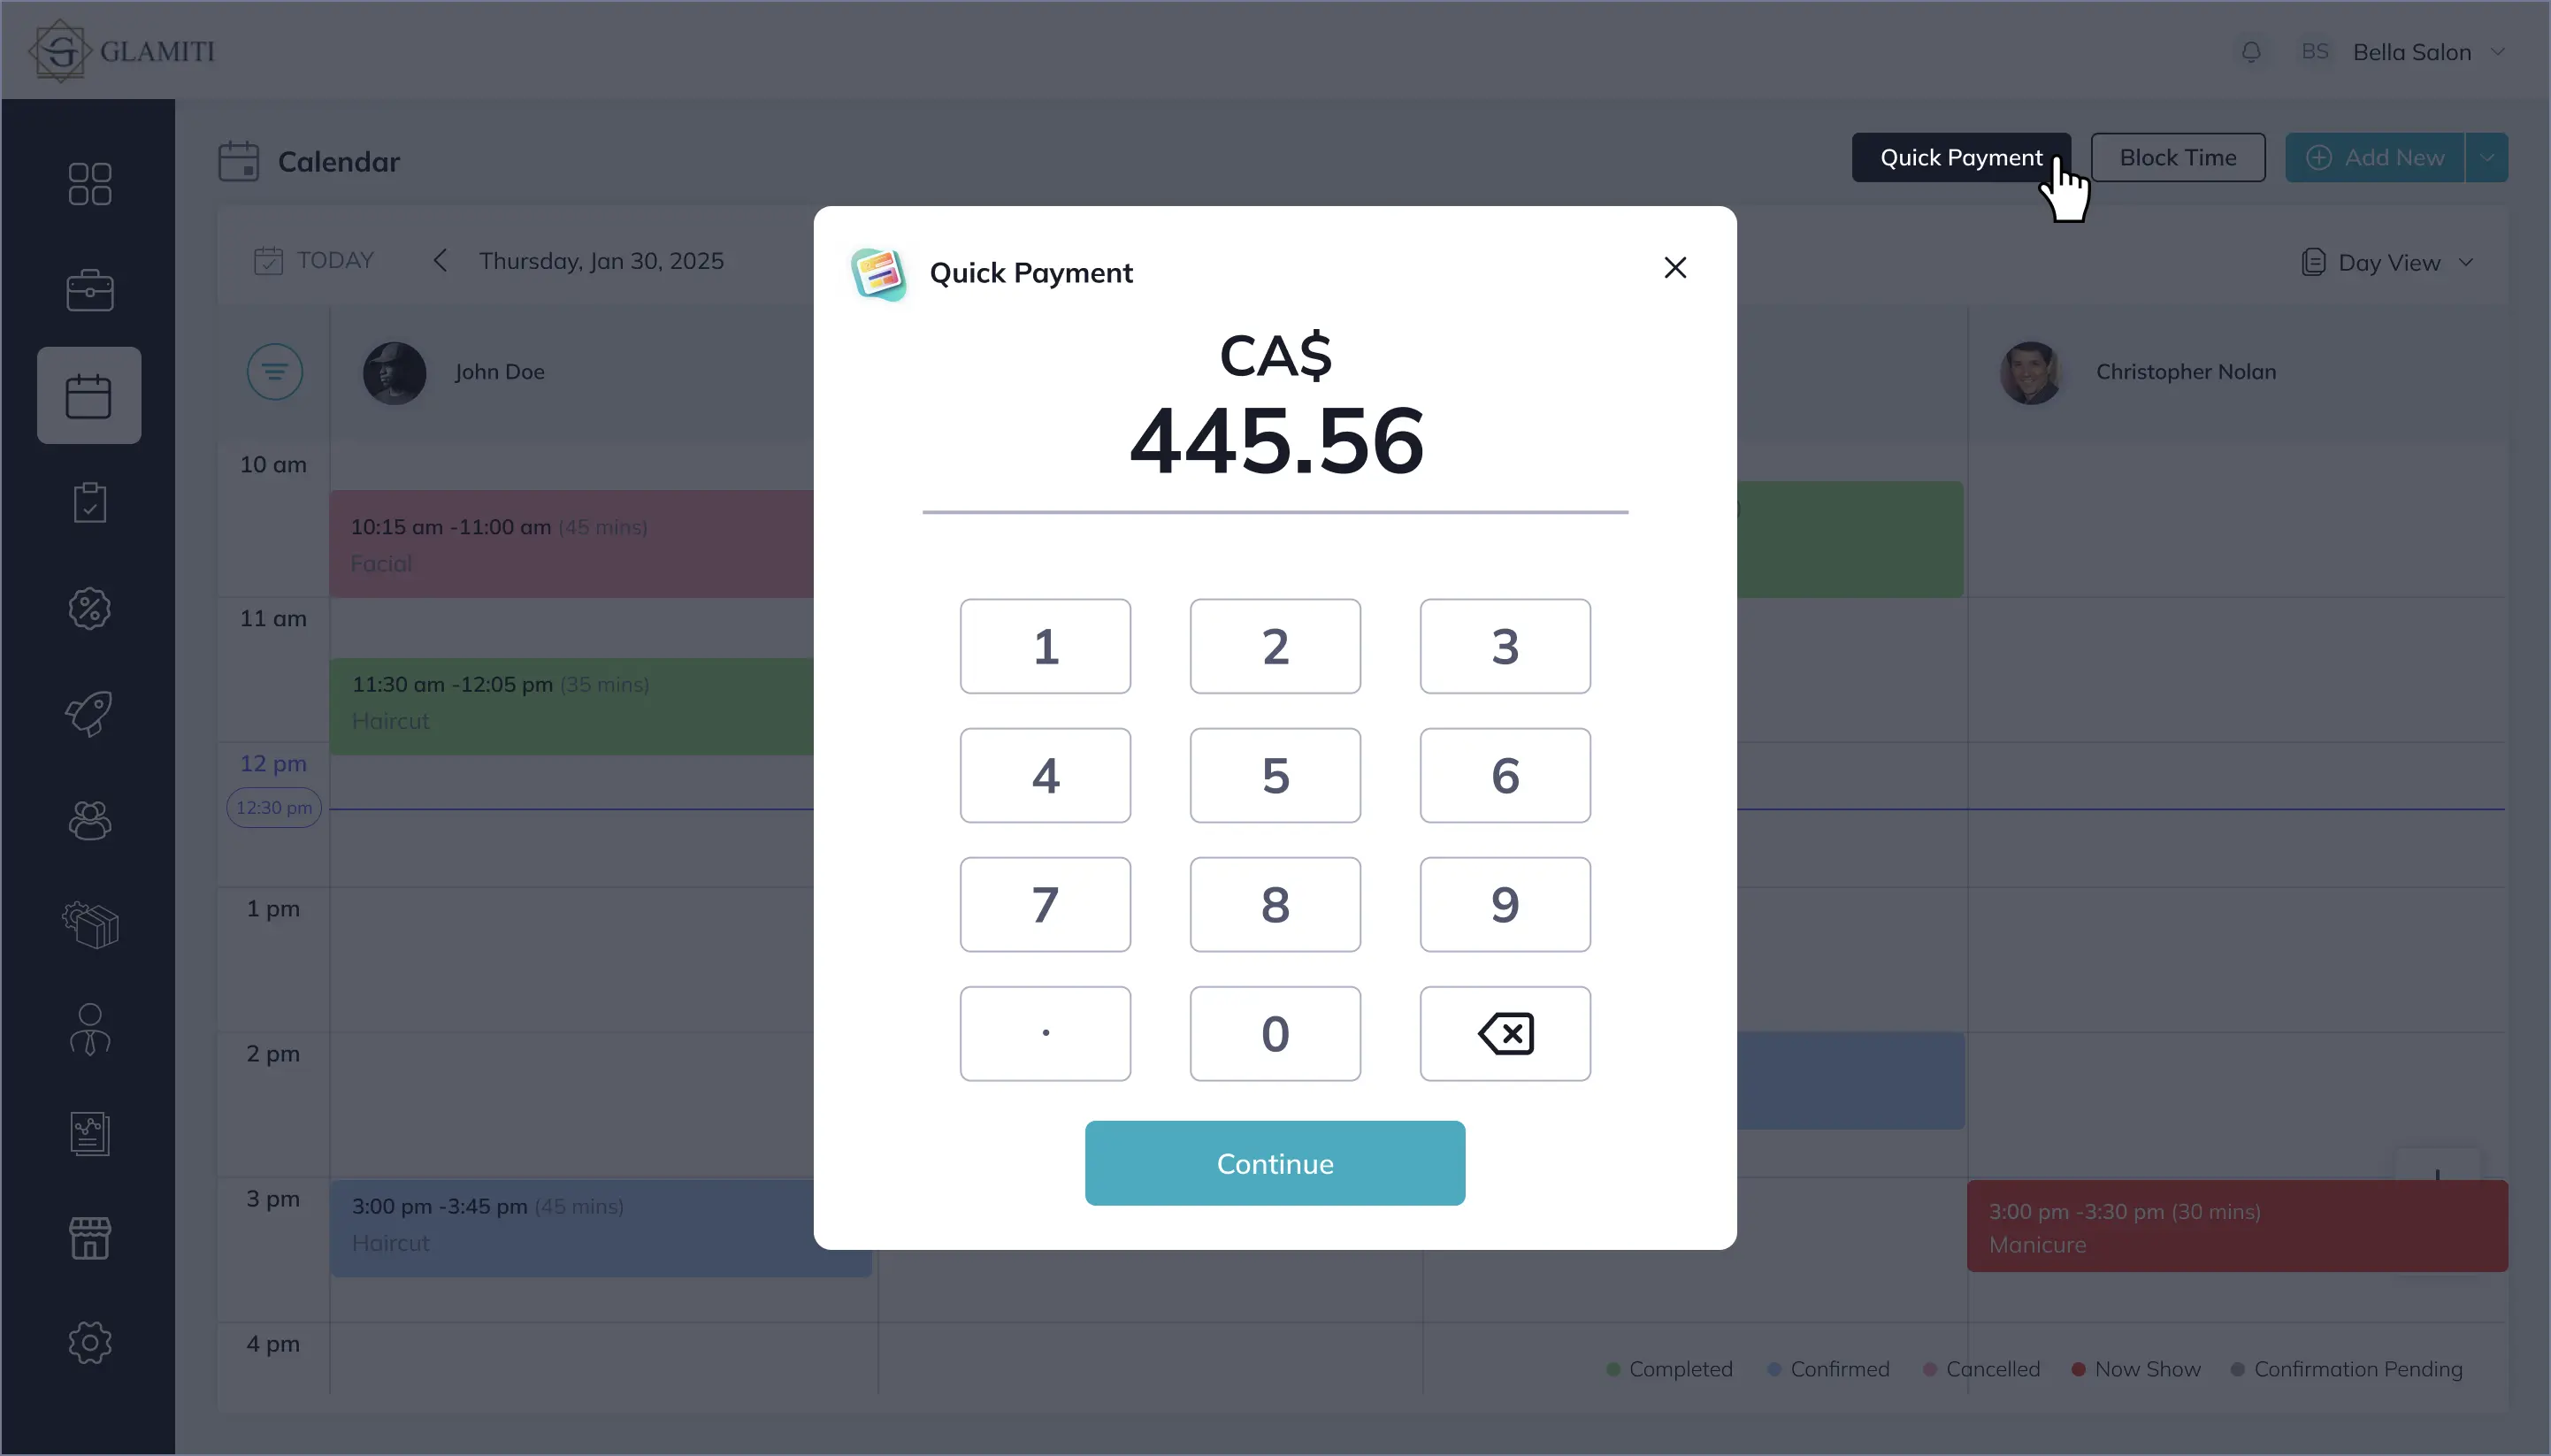
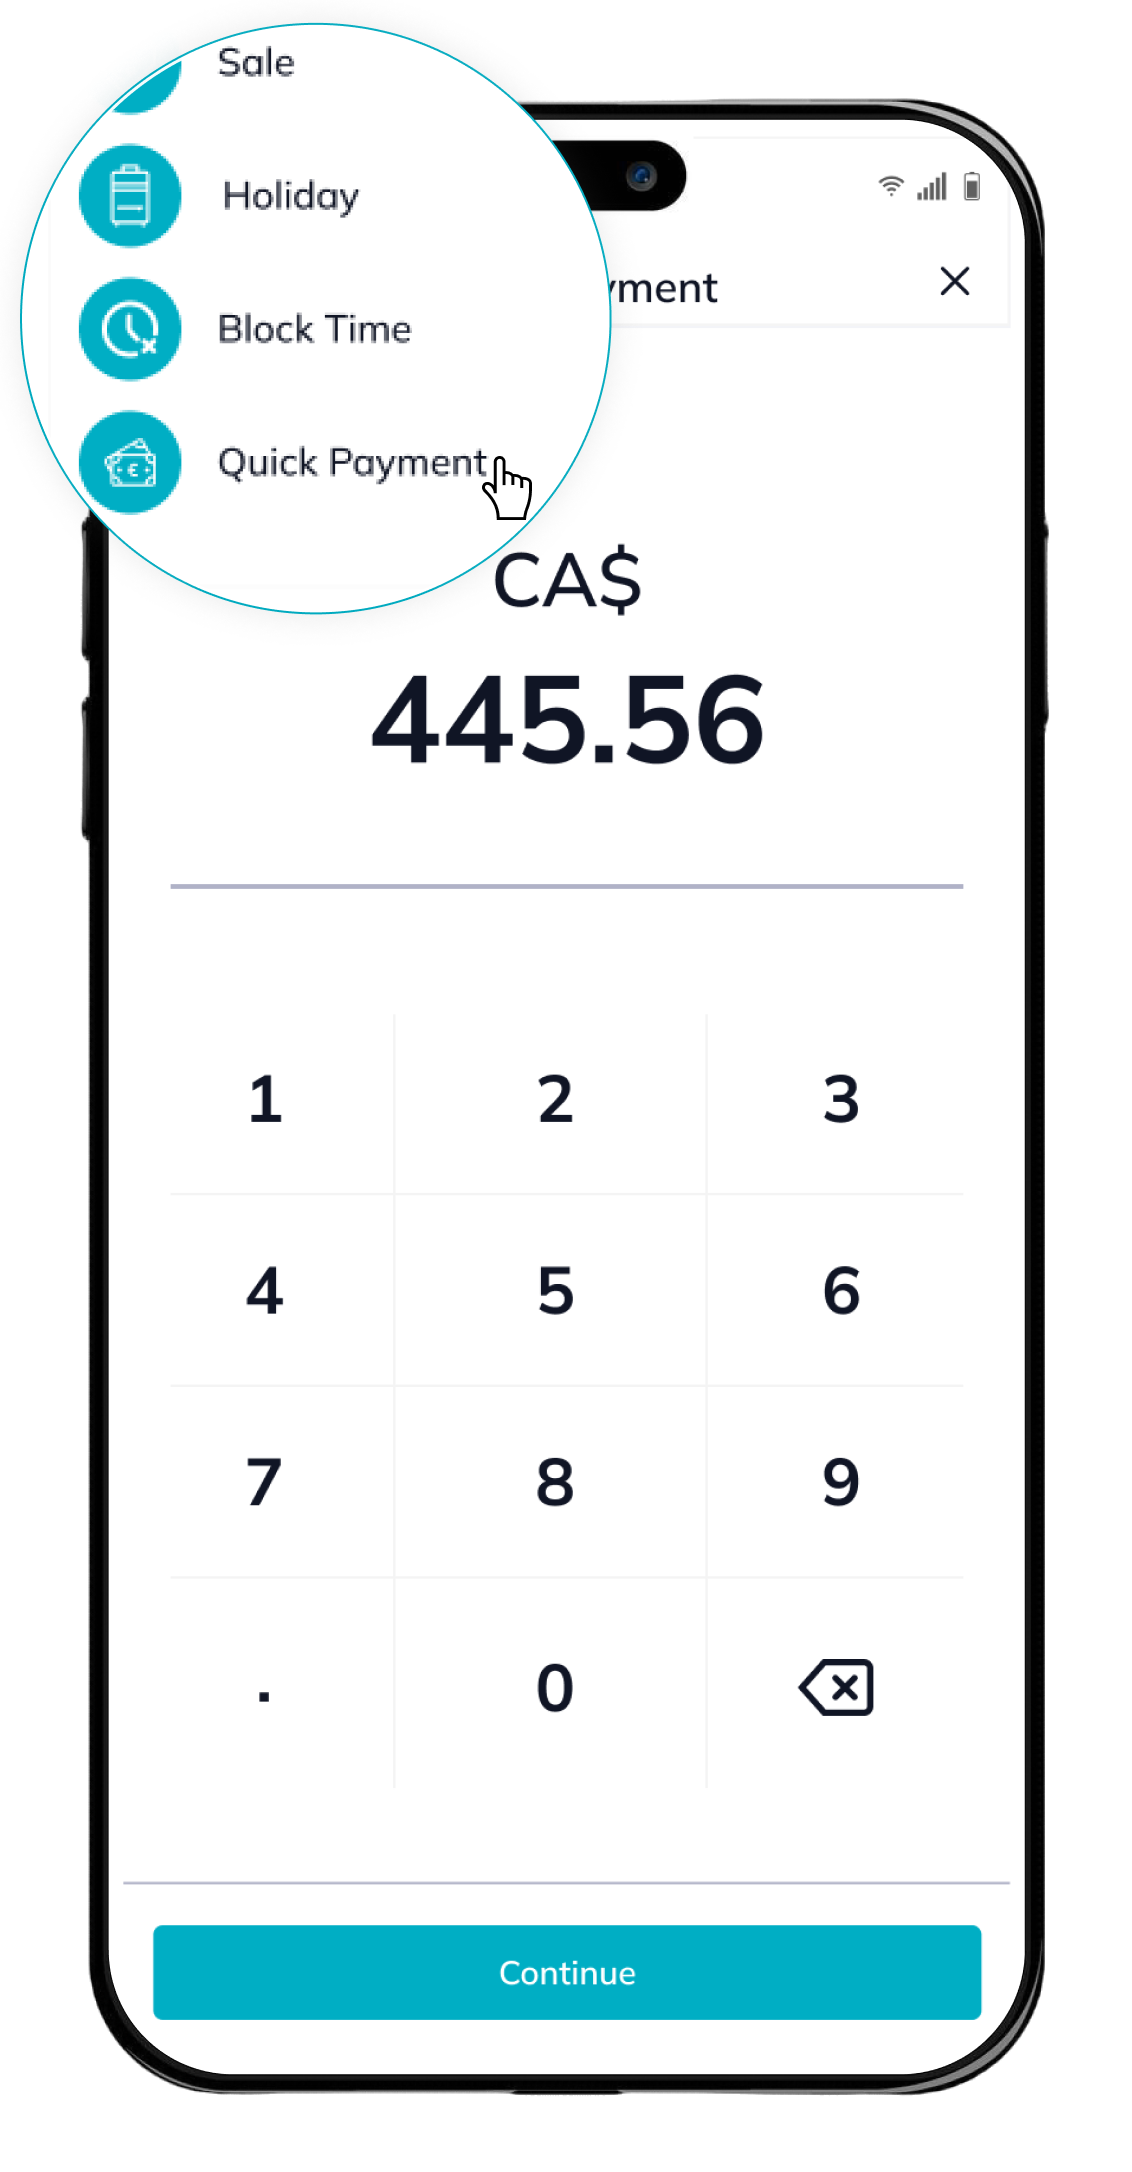
The 'Quick Payment' feature in Glamiti is designed to help merchants process payments faster, without the need to select specific services, products, or vouchers. This streamlined process is ideal for quick transactions, ensuring efficiency while maintaining accurate records.
How It Works:
- From your Calendar view, select 'Quick Payment' at the top to initiate a rapid checkout flow.
- Enter Amount: Simply input the total amount you wish to charge the customer.
- Add Tip (Optional): If applicable, you can add a tip amount before proceeding.
- Select Payment Method:Choose the customer’s preferred payment method.
- Finish: Complete the transaction with just a few clicks.
- Tap the “+” icon select at the bottom of the screen.
- Choose “Quick Payment” to launch the fast-payment interface.
- Add Tip (Optional): If applicable, you can add a tip amount before proceeding.
- Select Payment Method:Choose the customer’s preferred payment method.
- Finish: Complete the transaction with just a few clicks.
Key Features:
- Fast & Efficient: No need to add items like services, products, or vouchers—perfect for quick transactions.
- Tip Option: Merchants can easily add tips if required, ensuring flexibility during checkout.
- Accurate Record-Keeping: All Quick Payments are automatically recorded against a service named 'Miscellaneous Service' to maintain consistency in reports and transaction history.
Why Use Quick Payment?
This feature was introduced based on merchant feedback about the time taken to process standard sales. Quick Payment significantly reduces the time required for simple transactions, making it ideal for situations where speed is essential.
